
Free guide · Aion 2 Global · Elyos and Asmodian
Aion 2 Leveling Guide 1–45: Elyos and Asmodian

By nZ4Y9Fw · Routes from the Global client, launcher version 25 · Updated
Follow the main story and max your Monolith along the way; every feather is on the interactive map. The complete route takes about 7 to 9 hours, nearer 7, with its detours for feathers, sealed dungeons and side quests. Rushing, follow the yellow arrows and skip the feathers, taking a green side quest or sealed dungeon only when the story stops for an Ascension.
Elyos route Verteron
- 9 maps
- 51 sealed dungeons
- 187 feather pickups
Its green side quests fill your accessory and rune slots before 45.
Leveling an alt? Take the alt route: the same maps without the feathers.
Asmodian route Altgard
- 13 maps
- 54 sealed dungeons
- 187 feather pickups
Leveling an alt? Take the alt route: the same maps without the feathers.
Good habits
- Max your skills. Spend skill points as soon as you have them.
- Always equip better gear. Swap in every upgrade the moment it drops.
- Enhance each piece to +5 as you get it, and stop there: quest gear is replaced, as in the gear score guide. Under each map: the side quests that fill an empty accessory or rune slot.
- Collect titles and achievements as you go.
- If the story stops, it is waiting on an Ascension: fill the Ascension Gauge with a nearby green side quest or sealed dungeon, then do the Ascension quest from the Journal's Ascension tab.
- 3The order: each number sits on the arrow that arrives there
- Walk
- Side quests on the way, numbered after their yellow stop (3a, 3b …): they fill the Ascension Gauge the story waits on
- Teleport to a statue you have unlocked
- Leaves the map (its label says where you come back)
 Sealed dungeon: 2 Daevanion and 2 skill points each
 Feather: pick it up on the way
Map help
Just follow the arrows. When the story sends you back somewhere you have been, there is no new arrow: your quest tracker takes you, and the next arrow starts where you were. The maps start after the Poeta tutorial, which ends with the main quest Brigade Base Neutralization.
Tap a map for full size. Lines are drawn straight between places: they show the order, not the exact path. Under each map, its steps as text say the same.
Feathers, Monolith and titles
Feathers raise the Monolith, whose top level, 30, takes 560 points. On Global each pickup gives 3, so it takes 187 pickups; the route has 187. We picked the ones that add the least walking. Every feather location is on the interactive map. Hand the feathers in at the Monolith to take its titles (each map says when you reach one):
- Level 10, Verteron Inquirer: 1.6% movement speed equipped; 70 points, 24 pickups. The route gets you there on map 2.
- Level 20, Guardian of Verteron: PvE Damage Boost 3% and Penetration 210 equipped; 235 points, 79 pickups. The route gets you there on map 3.2.
- Level 30, Saint of Verteron: Defense 300, Damage Tolerance 3% and Block 100 equipped; 560 points, 187 pickups. The route gets you there on map 5.2.
- 3The order: each number sits on the arrow that arrives there
- Walk
- Side quests on the way, numbered after their yellow stop (3a, 3b …): they fill the Ascension Gauge the story waits on
- Teleport to a statue you have unlocked
- Leaves the map (its label says where you come back)
- Sealed dungeon: 2 Daevanion and 2 skill points each
- Feather: pick it up on the way
- Feather cluster: take every magenta feather in the ring
Map help
Just follow the arrows. When the story sends you back somewhere you have been, there is no new arrow: your quest tracker takes you, and the next arrow starts where you were. The maps start after the Ishalgen tutorial, which ends with the main quest The Longest Night.
Tap a map for full size. Lines are drawn straight between places: they show the order, not the exact path. Under each map, its steps as text say the same.
Feathers, Monolith and titles
Feathers raise the Monolith, whose top level, 30, takes 560 points. On Global each pickup gives 3, so it takes 187 pickups; the route has 187. We picked the ones that add the least walking, and at 10 feather clusters (a magenta ring on the map) you take every feather, like the lake at Odar’s Shade on map 2.3. Every feather location is on the interactive map. Hand the feathers in at the Monolith to take its titles (each map says when you reach one):
- Level 10, Altgard Inquirer: 1.6% movement speed equipped; 70 points, 24 pickups. The route gets you there on map 1.1.
- Level 20, Guardian of Altgard: PvE Damage Boost 3% and Penetration 210 equipped; 235 points, 79 pickups. The route gets you there on map 3.1.
- Level 30, Saint of Altgard: Defense 300, Damage Tolerance 3% and Block 100 equipped; 560 points, 187 pickups. The route gets you there on map 4.4.
Levels 1–10: just follow the main story through the Poeta tutorial; there are no side quests, feathers or sealed dungeons there. The maps start at level 10.
1.1 Dawn Legion Base to Eastern Cantas Valley
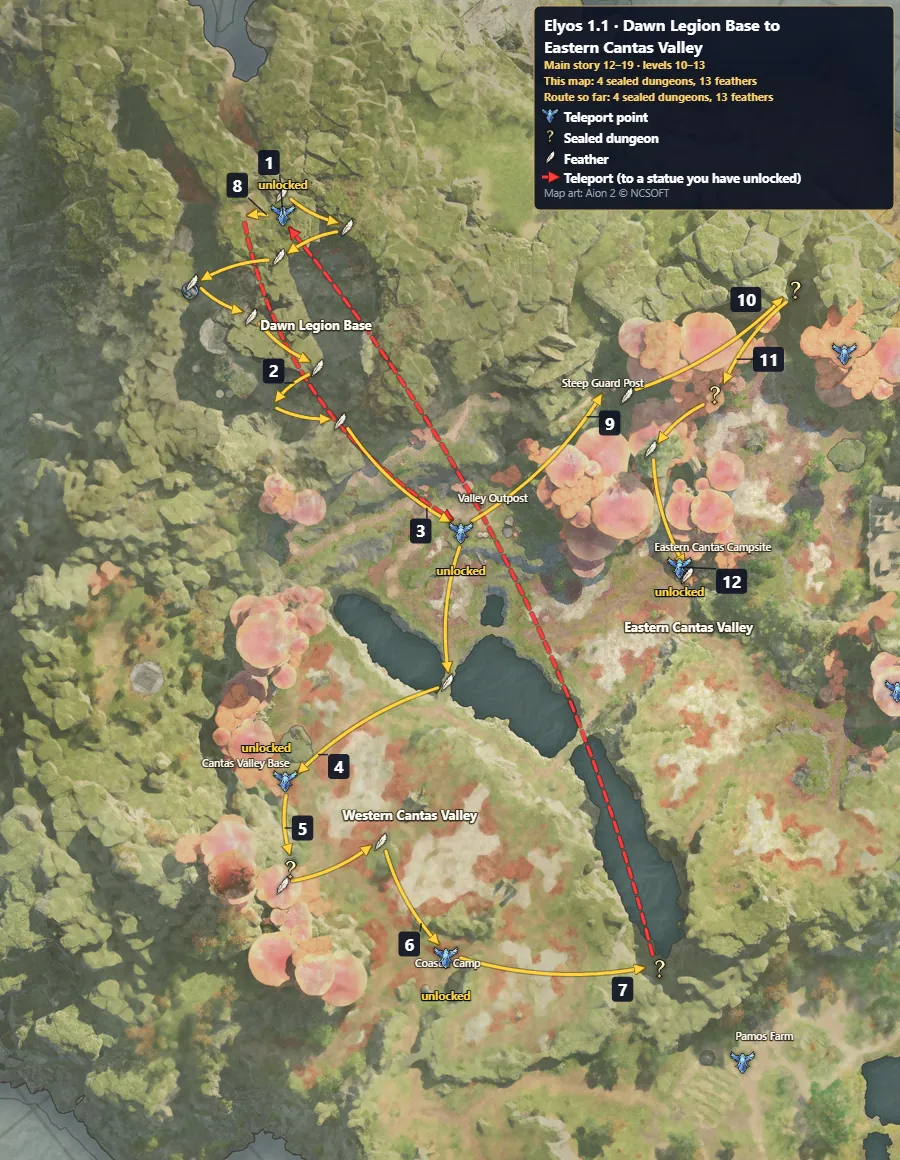
- Sealed dungeon: 2 Daevanion and 2 skill points each
- Feather
- Walk
- Teleport
Map 1.1's 12 steps as text
- Dawn Legion Base — Dawn Legion: talk to Nania, go to Caelid's Office. Unlocks the Dawn Legion Base teleport. Dawn Legion: talk to Shuron, hand in to Hart. All Geared Up: pick up from Nania.
- Dawn Legion Base — All Geared Up: talk to Etezia, hand in to Kaidros. Odyle Collection: pick up from Kaidros. Unlocks the Valley Outpost teleport.
- Western Cantas Valley — Odyle Collection: talk to Nania, collect Odyle from the Western Odyle Collector.
- Western Cantas Valley — Odyle Collection: defeat Kalgolem, hand in to Gabru. Bird's-eye View: pick up from Gabru, find Lebronus. Unlocks the Western Cantas Valley Camp teleport. Bird's-eye View: use the Updraft, go to Nania, talk to Nania.
- Chilly Hideout (sealed dungeon) — Unlocks the Coastal Camp teleport.
- Western Cantas Valley — Bird's-eye View: go to the Coastal Camp, hand in to Luteros. Valley of Hope: pick up from Luteros, go to the Coastal Cave, escape from the Coastal Cave, hand in to Nania. Soaring Free: pick up from Nania, talk to Nania, collect the feathers from the Crestlich Nest.
- Lupyllini Habitat (sealed dungeon) — Soaring Free: hand in to Nania — Dawn Legion Base. Visions in Smoke: pick up from Caelid — Dawn Legion Base. Teleport to Dawn Legion Base.
- Dawn Legion Base — Visions in Smoke: ride the Windstream to the funeral site. Illusion Cavaliers: talk to Nania. Teleport to Valley Outpost.
- Eastern Cantas Valley — Illusion Cavaliers: talk to Dakian.
- Cave of the Desperate (sealed dungeon)
- Mysterious Mushroom Cave (sealed dungeon) — Unlocks the Eastern Cantas Valley Campsite teleport.
- Eastern Cantas Valley — Illusion Cavaliers: talk to Rohin, collect Odylium Fragment from nearby creatures, hand in to Rohin.
All mapsSee it on the interactive mapNext: 1.2 · Ellun River Marsh to Dawn Legion Base →
1.2 Ellun River Marsh to Dawn Legion Base
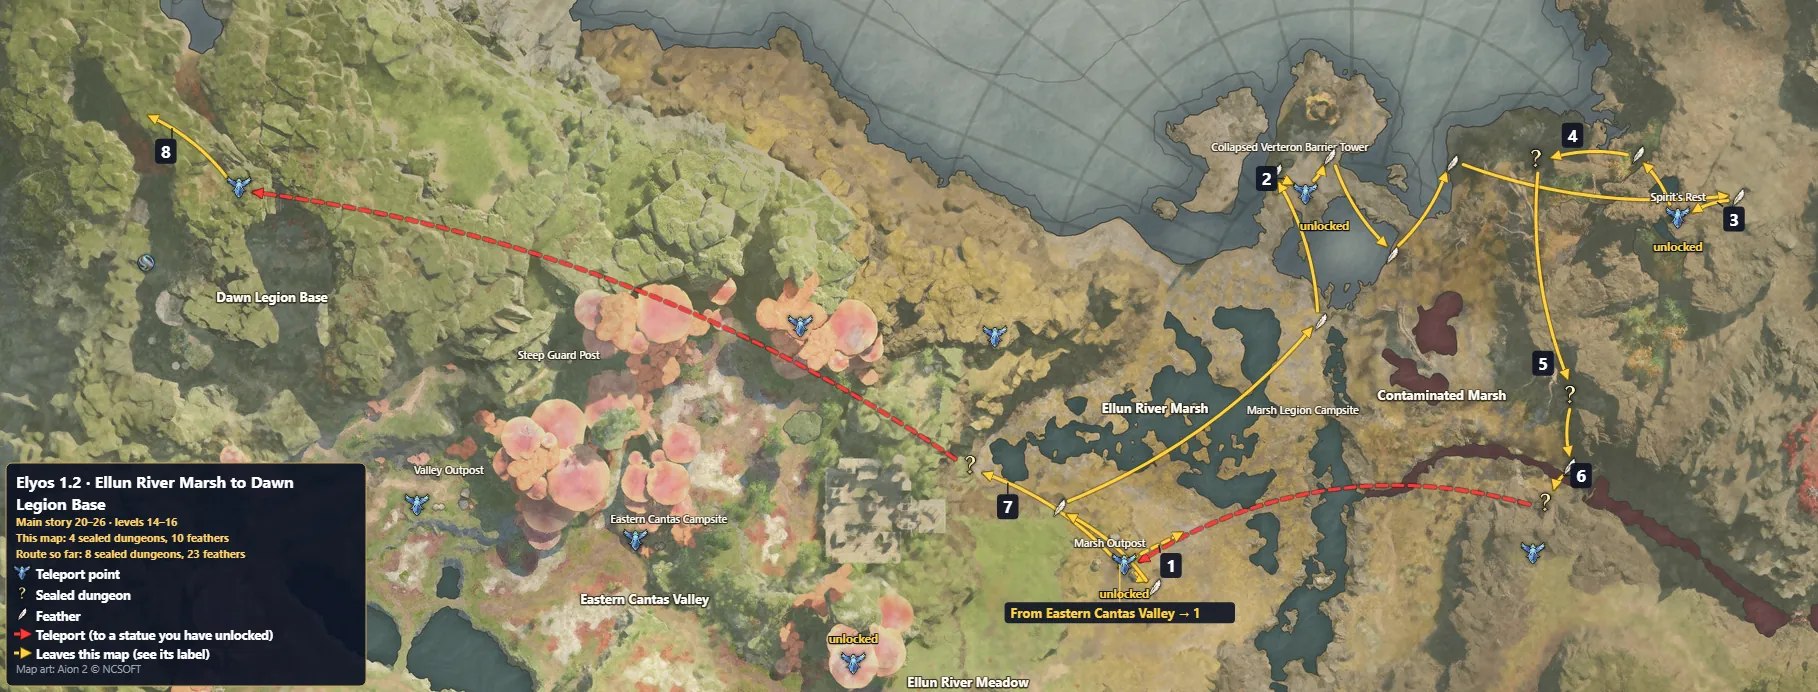
- Sealed dungeon: 2 Daevanion and 2 skill points each
- Feather
- Walk
- Teleport
Map 1.2's 8 steps as text
- Ellun River Marsh — Collapsed Barrier Tower: talk to Hithanya, retrieve the Odyle Shard from the chest, hand in to Ione — Collapsed Verteron Barrier Tower. Unlocks the Collapsed Verteron Barrier Tower teleport.
- Collapsed Verteron Barrier Tower — Rampaging Spirits: pick up from Ione, hand in to Ione. Beyond Etheria: pick up from Ione, go to Spirit's Rest — Ellun River Marsh. Unlocks the Spirit's Rest teleport.
- Ellun River Marsh — Beyond Etheria: talk to Ione, go to Luteros, hand in to Laveis. Undying Light: pick up from Laveis, interact with the rift fissure, talk to Laveis, talk to Luteros.
- Marsh Library (sealed dungeon)
- Filth Pit (sealed dungeon)
- Cursed Hideout (sealed dungeon) — Teleport to Marsh Outpost.
- Corrupted Spiritmaster's Residence (sealed dungeon) — Undying Light: hand in to Hithanya — Marsh Outpost. Awakened Hope: pick up from Hithanya — Marsh Outpost. Teleport to Dawn Legion Base.
- Dawn Legion Base — Awakened Hope: go outside the office, hand in to Luteros. Empyrean Monolith: pick up from Luteros, talk to Jackson, interact with Empyrean Trace: Verteron, interact with the Monolith, hand in to Luteros. Renewed Resolve: pick up from Luteros, talk to Luteros, hand in to Hepallin.
All mapsSee it on the interactive mapNext: 2 · Ellun River Midstream to Dawn Legion Temporary Outpost →
2 Ellun River Midstream to Dawn Legion Temporary Outpost
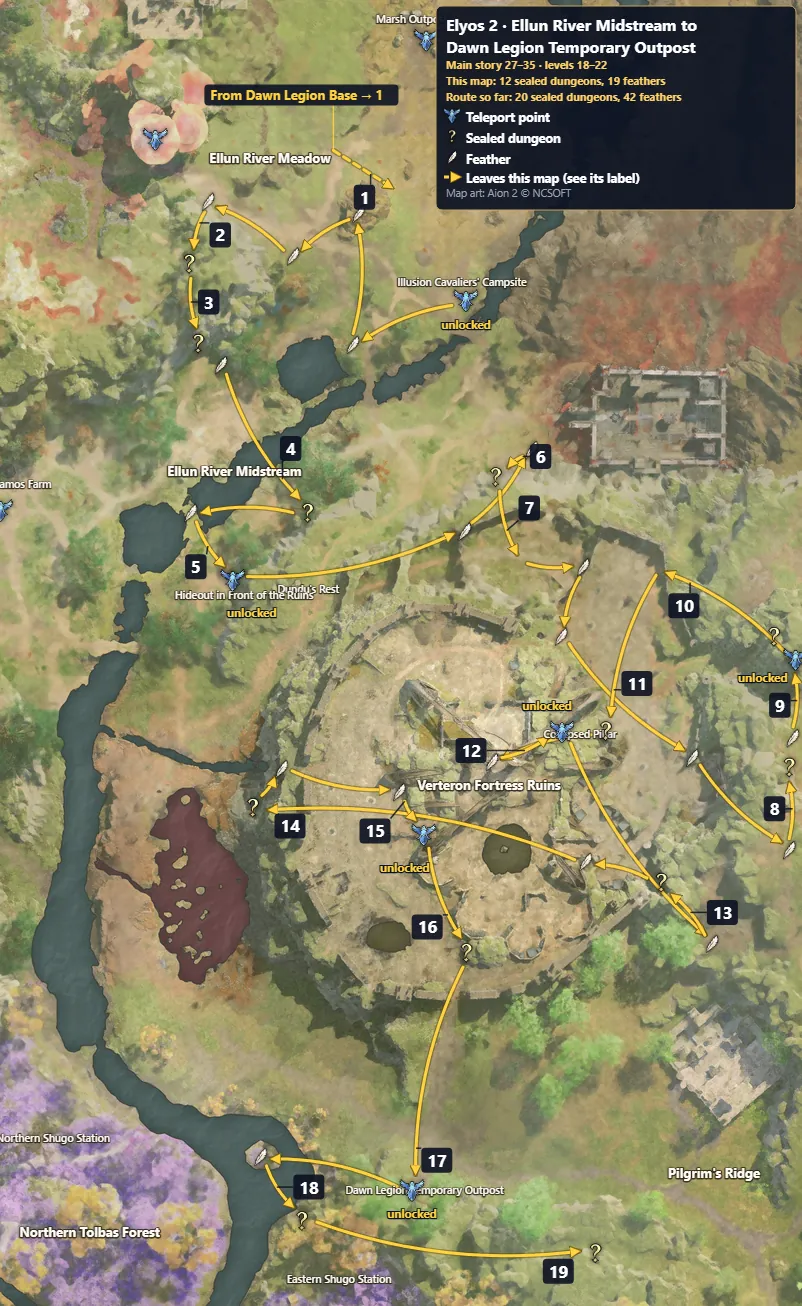
- Sealed dungeon: 2 Daevanion and 2 skill points each
- Feather
- Walk
Monolith level 10: you pass 70 points (24 pickups) on this map. Its title, Verteron Inquirer, gives 1.6% movement speed equipped.
Ascension gate after Illusion Oratory: when your Ascension Gauge is full, the Ascension quest The One Who Hears the Voice opens; take it from the Journal's Ascension tab and complete it to go on with Daeva in a Dream. Until the gauge is full, do nearby green side quests and sealed dungeons.
Map 2's 19 steps as text
- Ellun River Meadow — A Gesture of Sincerity: collect Hungry Brax Leather. Unlocks the Illusion Cavaliers' Campsite teleport. A Gesture of Sincerity: talk to Cecilia — Ellun River Midstream.
- Poacher's Den (sealed dungeon)
- Spirit Flower Cave (sealed dungeon)
- Bibliophile's Grave (sealed dungeon)
- Ellun River Midstream — A Gesture of Sincerity: close the rift fissure in the water, hand in to Cecilia — Hideout in Front of the Ruins. Transformation Prep: pick up from Cecilia — Hideout in Front of the Ruins. Unlocks the Hideout in Front of the Ruins teleport. Transformation Prep: talk to Phernos — Hideout in Front of the Ruins.
- Looted Repository (sealed dungeon)
- Verteron Fortress Ruins — Transformation Prep: collect the Kobold Spare Clothes, collect the Kobold Diary, collect the Kobold Shoes, talk to Cecilia, use the Language Artifact to learn, hand in to Cecilia. Fortress Ruins Infiltration: pick up from Cecilia, talk to Cecilia, talk to Caelid, talk to the Kobold Sentry, talk to the Kobold Servant, talk to the Krall Combatant, talk to the Krall Watcher.
- Karat's Nest (sealed dungeon) — Unlocks the Verteron Fortress Valley teleport.
- Fortress Grave (sealed dungeon)
- Verteron Fortress Ruins — Fortress Ruins Infiltration: check the Shift Instructions, talk to the Krall Supporter.
- Collapsed Fortress Cellar (sealed dungeon)
- Verteron Fortress Ruins — Fortress Ruins Infiltration: defeat Krall Armed Soldier, Guardian, and Ranger.
- Fortress Jail (sealed dungeon) — Fortress Ruins Infiltration: destroy the Balaur Communicator — Verteron Fortress Ruins (back at step 12), go to the Krall Command Post — Verteron Fortress Ruins, approach the Command Post — Verteron Fortress Ruins, hand in to Caelid — Collapsed Pillar. Unlocks the Collapsed Pillar teleport. Kaisinel's Seal: pick up from Caelid — Collapsed Pillar, hand in to Phernos — Collapsed Pillar. Path to the Altar: pick up from Phernos — Collapsed Pillar, destroy the Weapon Rack — Verteron Fortress Ruins.
- Deep Underground Cave (sealed dungeon)
- Verteron Fortress Ruins — Path to the Altar: defeat the enhanced Krall, hand in to Phernos. Unlocks the Illusion Oratory Entrance teleport. Illusion Oratory: pick up from Phernos, hand in to Caelid. Daeva in a Dream: hand in to Caelid.
- Hidden Ruins Altar (sealed dungeon) — Wind Breeze Merchants: pick up from Caelid — Verteron Fortress Ruins.
- Pilgrim's Ridge — Wind Breeze Merchants: talk to Caelid, hand in to Bao — Dawn Legion Temporary Outpost. Precious Minerals: pick up from Bao — Dawn Legion Temporary Outpost, talk to Dili — Ellun River Midstream.
- Forest Library (sealed dungeon) — Unlocks the Dawn Legion Temporary Outpost teleport. Precious Minerals: talk to Bao at Dawn Legion Temporary Outpost — Dawn Legion Temporary Outpost (back at step 17).
- Solitary Rock Tomb (sealed dungeon) — Precious Minerals: hand in to Caelid — Dawn Legion Temporary Outpost.
All mapsSee it on the interactive mapNext: 3.1 · Wind Breeze Merchants HQ to Southern Tolbas Forest →
3.1 Wind Breeze Merchants HQ to Southern Tolbas Forest
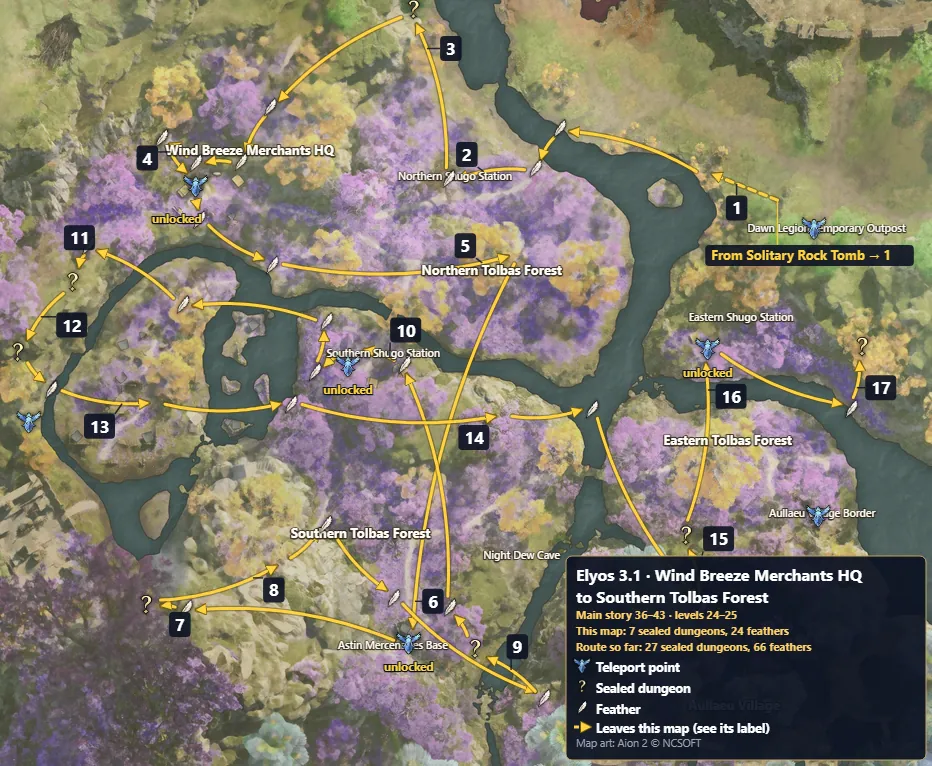
- Sealed dungeon: 2 Daevanion and 2 skill points each
- Feather
- Walk
Map 3.1's 17 steps as text
- Ellun River Midstream — Mutual Benefit: talk to Bao.
- Northern Shugo Station — Mutual Benefit: talk to Bao.
- Akilo Thieves Den (sealed dungeon)
- Wind Breeze Merchants HQ — Mutual Benefit: talk to Kochi, talk to Bao, hand in to Caelid. Shugonapped: pick up from Caelid, collect the Gravi Herb — Northern Tolbas Forest. Unlocks the Wind Breeze Merchants HQ teleport. Shugonapped: go to the Wind Breeze Merchant HQ, hand in to Caelid. Finding Kochi: pick up from Caelid.
- Northern Tolbas Forest — Finding Kochi: examine the Weapon Remnants, destroy the Aullaeu Defense Totem, hand in to Bao — Wind Breeze Merchants HQ. Mercenary Pursuit: pick up from Arin — Wind Breeze Merchants HQ, talk to Caelid — Southern Shugo Station, hand in to Astin — Astin Mercenaries Base. Weapon's Owner: pick up from Astin — Astin Mercenaries Base. Unlocks the Astin Mercenaries Base teleport. Unlocks the Southern Shugo Station teleport.
- Astin Mercenaries Base — Weapon's Owner: talk to Carter, talk to Jade — Southern Tolbas Forest.
- Hidden Valley (sealed dungeon) — Weapon's Owner: hand in to Baison — Southern Tolbas Forest. Best Served Cold: pick up from Baison — Southern Tolbas Forest.
- Southern Tolbas Forest — Best Served Cold: go to the Secret Storage, hand in to Baison. Hidden Scheme: pick up from Baison, go to the Night Dew Cave — Night Dew Cave.
- Wild Biruta Habitat (sealed dungeon) — Hidden Scheme: go to the Mercenaries Base — Astin Mercenaries Base (back at step 6), talk to Jade — Southern Tolbas Forest.
- Southern Shugo Station — Hidden Scheme: talk to Bao.
- Herb Cave (sealed dungeon)
- Abandoned Odylium Cave (sealed dungeon)
- Southern Tolbas Forest — Hidden Scheme: defeat the mercenary to retrieve the supplies, talk to Bao — Southern Shugo Station, hand in to Caelid.
- Southern Tolbas Forest — Crime Scene: pick up from Caelid.
- Deadly Poison Den (sealed dungeon) — Unlocks the Eastern Shugo Station teleport.
- Eastern Shugo Station — Crime Scene: hand in to Bao.
- Fissure Cave (sealed dungeon)
All mapsSee it on the interactive mapNext: 3.2 · Aullaeu Village Border to Wind Breeze Merchants HQ →
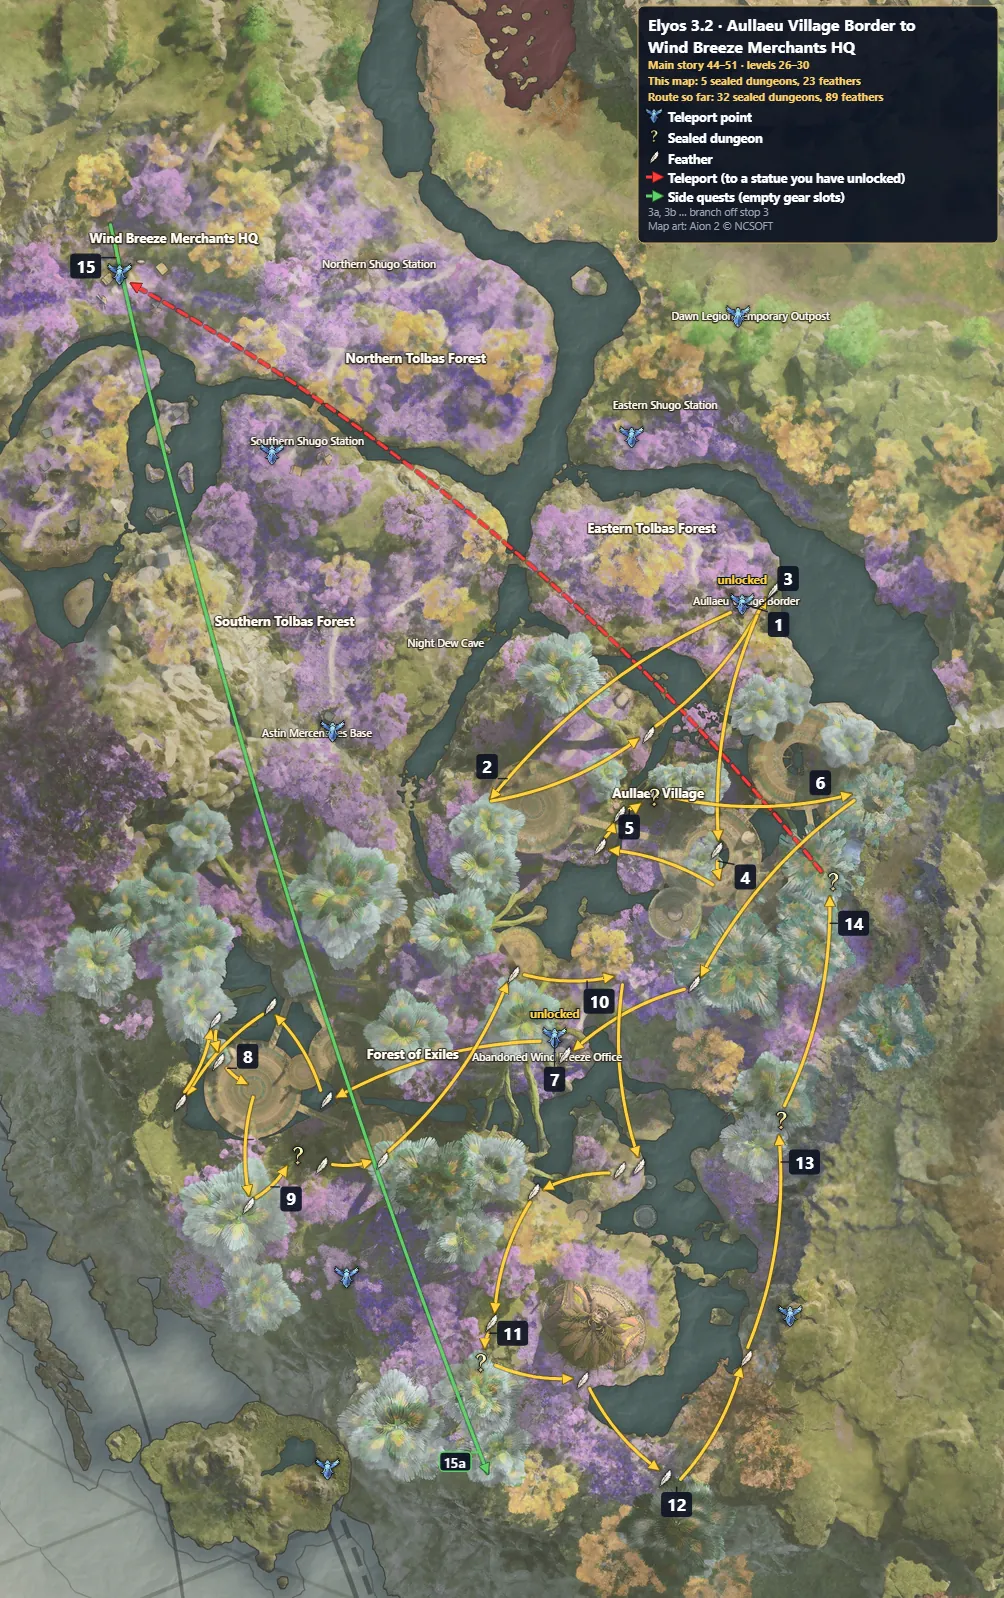
3.2 Aullaeu Village Border to Wind Breeze Merchants HQ
Green arrows are side quests, numbered after the yellow stop they branch from: 15a after stop 15. Pick them up on the way: they fill the Ascension Gauge, which the main story stops to wait on.
- Sealed dungeon: 2 Daevanion and 2 skill points each
- Feather
- Walk
- Side quest
- Teleport
Monolith level 20: you pass 235 points (79 pickups) on this map. Its title, Guardian of Verteron, gives PvE Damage Boost 3% and Penetration 210 equipped.
Map 3.2's 15 steps as text
- Eastern Tolbas Forest — Thorough Preparation: destroy the Aullaeu Sorcery Totem. Unlocks the Aullaeu Village Border teleport. Thorough Preparation: talk to Bao — Aullaeu Village Border.
- Aullaeu Village — Thorough Preparation: collect Aullaeu Orders, collect the Helm from the Goods Basket, collect the Aullaeu Apprentice Shaman's Accessory, collect the Aullaeu Village Guard's Feather, hand in to Caelid — Aullaeu Village Border. Shugo Tracks: pick up from Caelid — Aullaeu Village Border.
- Aullaeu Village Border — Shugo Tracks: talk to Caelid, talk to the Aullaeu Sentinel — Aullaeu Village, talk to the Aullaeu Trainee — Aullaeu Village, check the first Guard Log — Aullaeu Village, check the second Guard Log — Aullaeu Village.
- Aullaeu Village — Shugo Tracks: check the third Guard Log, go to the second floor of the residence.
- Wild Kuru Habitat (sealed dungeon) — Shugo Tracks: hand in to Bao — Aullaeu Village Border. Shugo in the Cellar: pick up from Bao — Aullaeu Village Border.
- Aullaeu Village — Shugo in the Cellar: talk to Caelid, hand in to Kochi. Exiled Aullaeu: pick up from Kochi. Unlocks the Abandoned Wind Breeze Office teleport.
- Abandoned Wind Breeze Office — Exiled Aullaeu: talk to Kochi, defeat the Aullaeu Wandering Brawler — Forest of Exiles, defeat the Aullaeu Wandering Swordsman — Forest of Exiles, defeat Aullaeu Wandering Ranger — Forest of Exiles, hand in to Daki — Forest of Exiles. Holyaul Rescue Operation: pick up from Daki — Forest of Exiles.
- Forest of Exiles — Holyaul Rescue Operation: commence the Holyaul Rescue Operation.
- Prison of Exiles (sealed dungeon) — Holyaul Rescue Operation: hand in to Kochi — Abandoned Wind Breeze Office. Aulamus's Key: pick up from Kochi — Abandoned Wind Breeze Office.
- Aullaeu Village — Aulamus's Key: defeat the Aullaeu Wandering Warrior, destroy the Sorcery Field Totem, defeat the Sorcery Field Aullaeu.
- Red Dragon Altar (sealed dungeon) — Aulamus's Key: hand in to Caelid — Aullaeu Village. Secrets of the Altar: pick up from Caelid — Aullaeu Village.
- Aullaeu Village — Secrets of the Altar: talk to Phernos.
- Cave Storage (sealed dungeon)
- Aullaeu Oratory (sealed dungeon) — Secrets of the Altar: hand in to Caelid — Aullaeu Village Border. Secrets Within Secrets: pick up from Caelid — Aullaeu Village Border, talk to Kochi — Aullaeu Village Border (back at step 3). Teleport to Wind Breeze Merchants HQ.
- Wind Breeze Merchants HQ — Secrets Within Secrets: talk to Kochi, talk to Sami — Ellun River Midstream. Side quest Cursed Blue Mineral (15a): pick up. Side quest Cursed Blue Mineral (15a): hand in — Aullaeu Village. Secrets Within Secrets: hand in to Nania.
| Gives | Side quest | Level | Arrow |
|---|---|---|---|
 Clash Rune Chest | Cursed Blue Mineral | 30 | 15a |
All mapsSee it on the interactive mapNext: 4.1 · Zumion Village to Altamia Canyon →
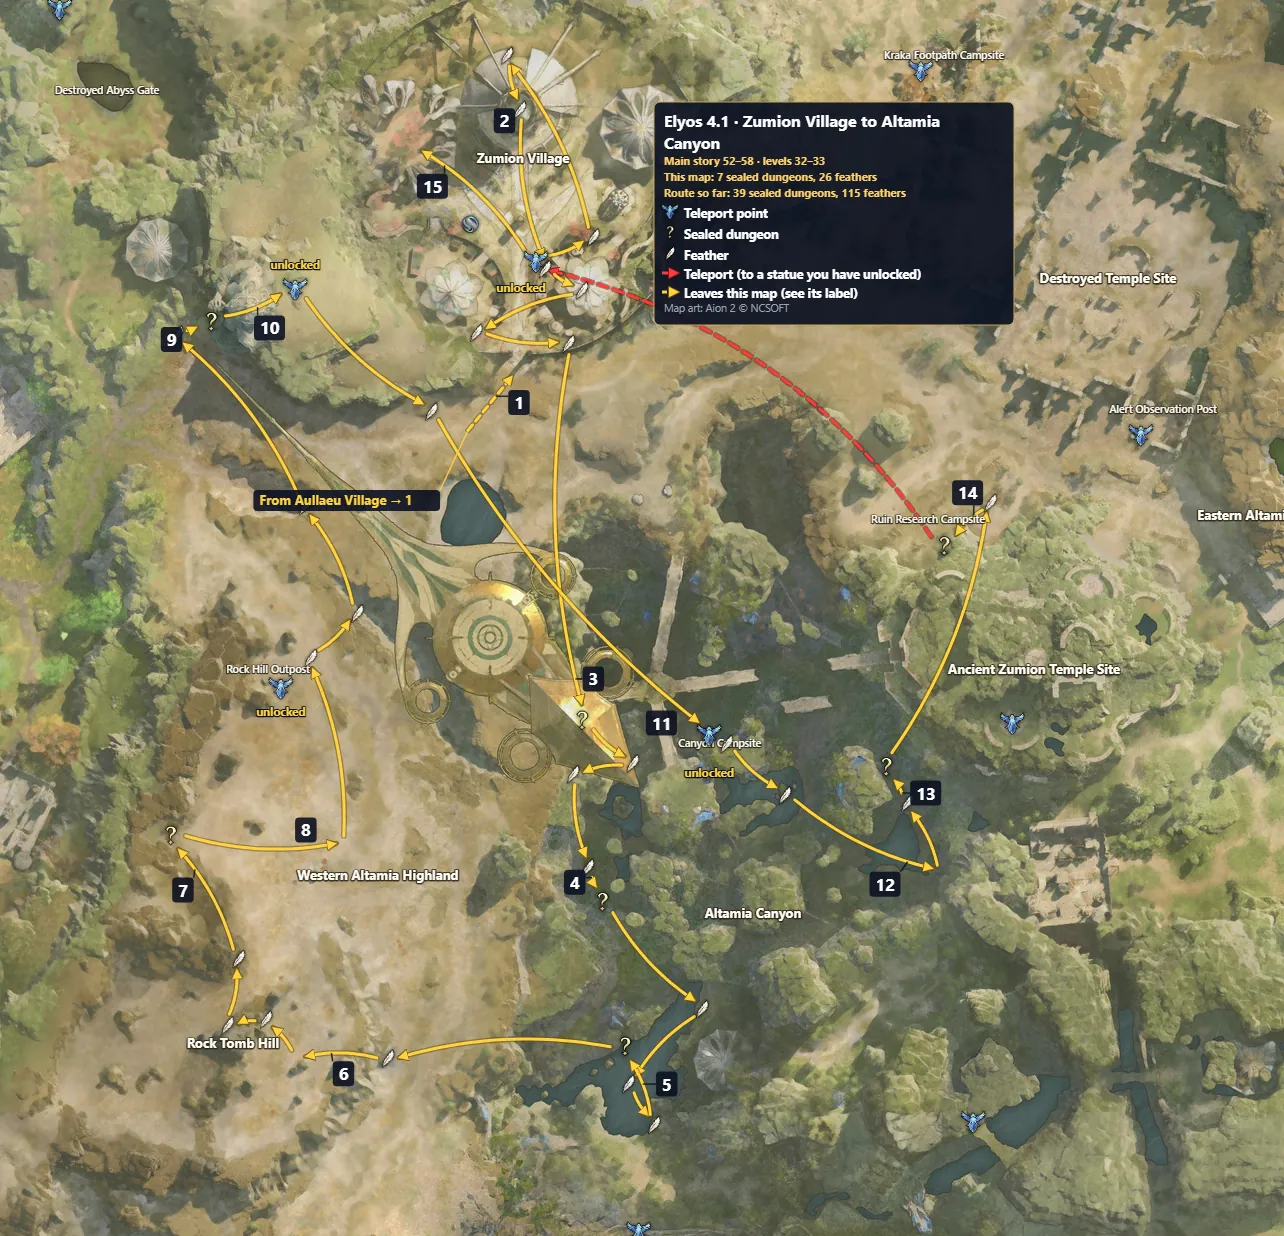
4.1 Zumion Village to Altamia Canyon
- Sealed dungeon: 2 Daevanion and 2 skill points each
- Feather
- Walk
- Teleport
Ascension gate after Protectors of the Rock Hill: when your Ascension Gauge is full, the Ascension quest The One Who Dreams opens; take it from the Journal's Ascension tab and complete it to go on with Another Dream. Until the gauge is full, do nearby green side quests and sealed dungeons.
Map 4.1's 15 steps as text
- Zumion Village — An Uneasy Alliance: talk to Caelid. Unlocks the Zumion Village teleport. An Uneasy Alliance: go to the Central Plaza, talk to Ordan, go to the residential area, talk to Aus.
- Zumion Village — An Uneasy Alliance: go to the Blessing Room, collect the Odyle Powder from the Highland Sparkie — Western Altamia Highland (back at step 1).
- Guardian's Armory (sealed dungeon)
- Balaur Scouts Outpost (sealed dungeon)
- Deep Dark Pit (sealed dungeon) — An Uneasy Alliance: hand in to Rodelos — Rock Hill Outpost. Rocky Tomb: pick up from Rodelos — Rock Hill Outpost.
- Rock Tomb Hill — Rocky Tomb: defeat the Renegade Daeva Patrol, defeat the Renegade Daeva Watcher, inspect the Illusion God's Barrierstone in the east, defeat the Sura at the western area, inspect the Illusion God's Barrierstone in the west.
- Kius's Residence (sealed dungeon) — Rocky Tomb: hand in to Rodelos — Rock Hill Outpost. Protectors of the Rock Hill: pick up from Rodelos — Rock Hill Outpost.
- Western Altamia Highland — Protectors of the Rock Hill: investigate the quest target, talk to Rodelos — Rock Hill Outpost.
- Broken Hall of Knowledge (sealed dungeon) — Unlocks the Zumion Statue teleport.
- Zumion Village — Protectors of the Rock Hill: go to Dymones, hand in to Dymones. Another Dream: hand in to Dymones. Shadow of the Canyon: pick up from Dymones. Unlocks the Canyon Campsite teleport.
- Canyon Campsite — Shadow of the Canyon: talk to Caelid, hand in to Odite. Barrier Traces: pick up from Odite, examine the Ancient Tablet, destroy the Dark Spiritstone — Altamia Canyon, examine the Ancient Barrierstone — Altamia Canyon.
- Altamia Canyon — Barrier Traces: approach the barrier, talk to Phernos, examine the Illusion Veil.
- Canyon Library (sealed dungeon)
- Scribe's Room (sealed dungeon) — Barrier Traces: hand in to Dymones — Zumion Village. Between Faith and Doubt: pick up from Dymones — Zumion Village. Teleport to Zumion Village.
- Zumion Village — Between Faith and Doubt: talk to Adrian, hand in to Lachesis — Alert Observation Post.
All mapsSee it on the interactive mapNext: 4.2 · Alert Observation Post to Zumion Village →
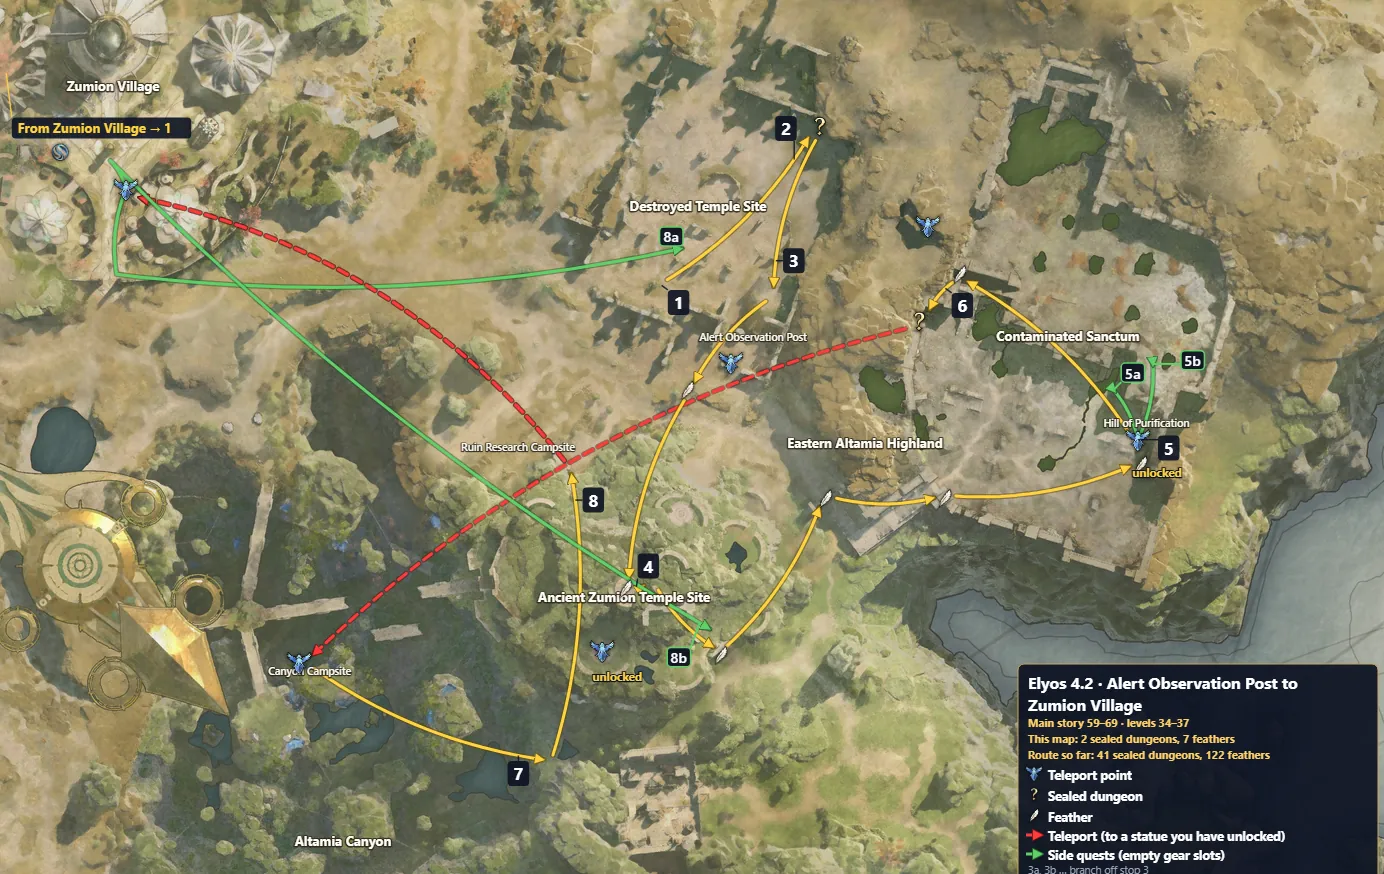
4.2 Alert Observation Post to Zumion Village
Green arrows are side quests, numbered after the yellow stop they branch from: 5a–5b after stop 5, 8a–8b after stop 8. Pick them up on the way: they fill the Ascension Gauge, which the main story stops to wait on.
- Sealed dungeon: 2 Daevanion and 2 skill points each
- Feather
- Walk
- Side quest
- Teleport
Map 4.2's 8 steps as text
- Destroyed Temple Site — Headless Statue: defeat Wandering Knight's Soul, defeat Wandering Ranger's Soul, examine the Estian Statue, examine the Agathon Statue, examine the Calliste Statue, hand in to Luteros. Priests of Zumion: pick up from Luteros, examine the Healing Monolith: Sacrifice, examine the Healing Monolith: Oath of the Seal, examine the Healing Monolith: Declaration of Resistance.
- Targoth's Cave (sealed dungeon)
- Destroyed Temple Site — Priests of Zumion: talk to Luteros, collect the essence from the Furious Knight's Corpse, collect the Ashen Kalgolem Fragment, retrieve the Statue Head Fragment, hand in to Phernos — Alert Observation Post. Fragmented Tale: pick up from Phernos — Alert Observation Post, destroy Wandering Knight's Armor, destroy Altamia Highland Ruins Device, talk to the Agathon Statue, talk to the Calliste Statue, talk to the Estian Statue, talk to Luteros, hand in to Phernos — Alert Observation Post. Zumion's Ward: pick up from Phernos — Alert Observation Post.
- Ancient Zumion Temple Site — Zumion's Ward: talk to Nania, hand in to Phernos — Alert Observation Post. Purifying Flame: pick up from Phernos — Alert Observation Post. Unlocks the Hill of Purification teleport.
- Hill of Purification — Purifying Flame: talk to Gustino, obtain the Purifying Powder from the Guardite — Contaminated Sanctum, obtain the Mutated Vine Bundle Root — Contaminated Sanctum, ignite the Pure Purifying Brazier — Contaminated Sanctum, ignite the Clear Purifying Brazier — Contaminated Sanctum, ignite the Abundant Purifying Brazier — Contaminated Sanctum, hand in to Gustino. Perilous Purification: pick up from Gustino, defeat Yellow-Tailed Skama — Contaminated Sanctum, defeat Contaminated Scorpion — Contaminated Sanctum, hand in to Gustino. Activating Altar Purification Devices: pick up from Gustino, collect the Contaminated Guardite's Mana Conduit — Contaminated Sanctum, collect the Weak Odyle Aura — Contaminated Sanctum, activate the Left Purification Device — Contaminated Sanctum, activate the Center Purification Device — Contaminated Sanctum. Side quest Price of Bravado (5a): pick up. Side quest Price of Bravado (5a): step 1: Defeat Contaminated Poison Slime — Contaminated Sanctum. Side quest Price of Bravado (5a): hand in. Side quest To New Beginnings (5b): pick up. Side quest To New Beginnings (5b): step 1: Collect Contaminated Guardite samples — Contaminated Sanctum. Side quest To New Beginnings (5b): hand in. Activating Altar Purification Devices: activate the Right Purification Device — Contaminated Sanctum, hand in to Gustino. Path to the Altar: pick up from Gustino, defeat the Contaminated Monster — Contaminated Sanctum, destroy the Contamination Clot — Contaminated Sanctum, hand in to Gustino — Contaminated Sanctum. Meslamtaeda's Poison: pick up from Gustino — Contaminated Sanctum, open the Purifying Altar Door — Purifying Altar, talk to Gustino — Contaminated Sanctum.
- Altar of Hope (sealed dungeon) — Meslamtaeda's Poison: hand in to Caelid — Canyon Campsite. Those Who Remain: pick up from Caelid — Canyon Campsite. Teleport to Canyon Campsite.
- Ancient Zumion Temple Site — Those Who Remain: dispel the Illusion Veil, hand in to Dymones — Zumion Village. Fire Temple: pick up from Dymones — Zumion Village.
- Ancient Zumion Temple Site — Fire Temple: talk to Phion, investigate the Fire Temple. Side quest Zumion's Call: Part One (8a): pick up — Zumion Village. Side quest Zumion's Call: Part One (8a): step 2: Go to the Destroyed Temple Site — Destroyed Temple Site. Side quest Tempestuous Dawn (8b): pick up — Zumion Village. Side quest Tempestuous Dawn (8b): step 3: Go to Phernos. Fire Temple: hand in to Dymones — Zumion Village.
| Gives | Side quest | Level | Arrow |
|---|---|---|---|
 Drifter Earrings (Epic) | Price of Bravado | 36 | 5a |
 Drifter Bracelet (Epic) | Tempestuous Dawn | 37 | 8b |
| Drifter Bracelet (Epic) | To New Beginnings | 37 | 5b |
 Drifter Ring (Epic) | Zumion's Call: Part One | 37 | 8a, then 11b on map 5.2 |
All mapsSee it on the interactive mapNext: 5.1 · Zumion Village to Nahid Brigade Fortress →
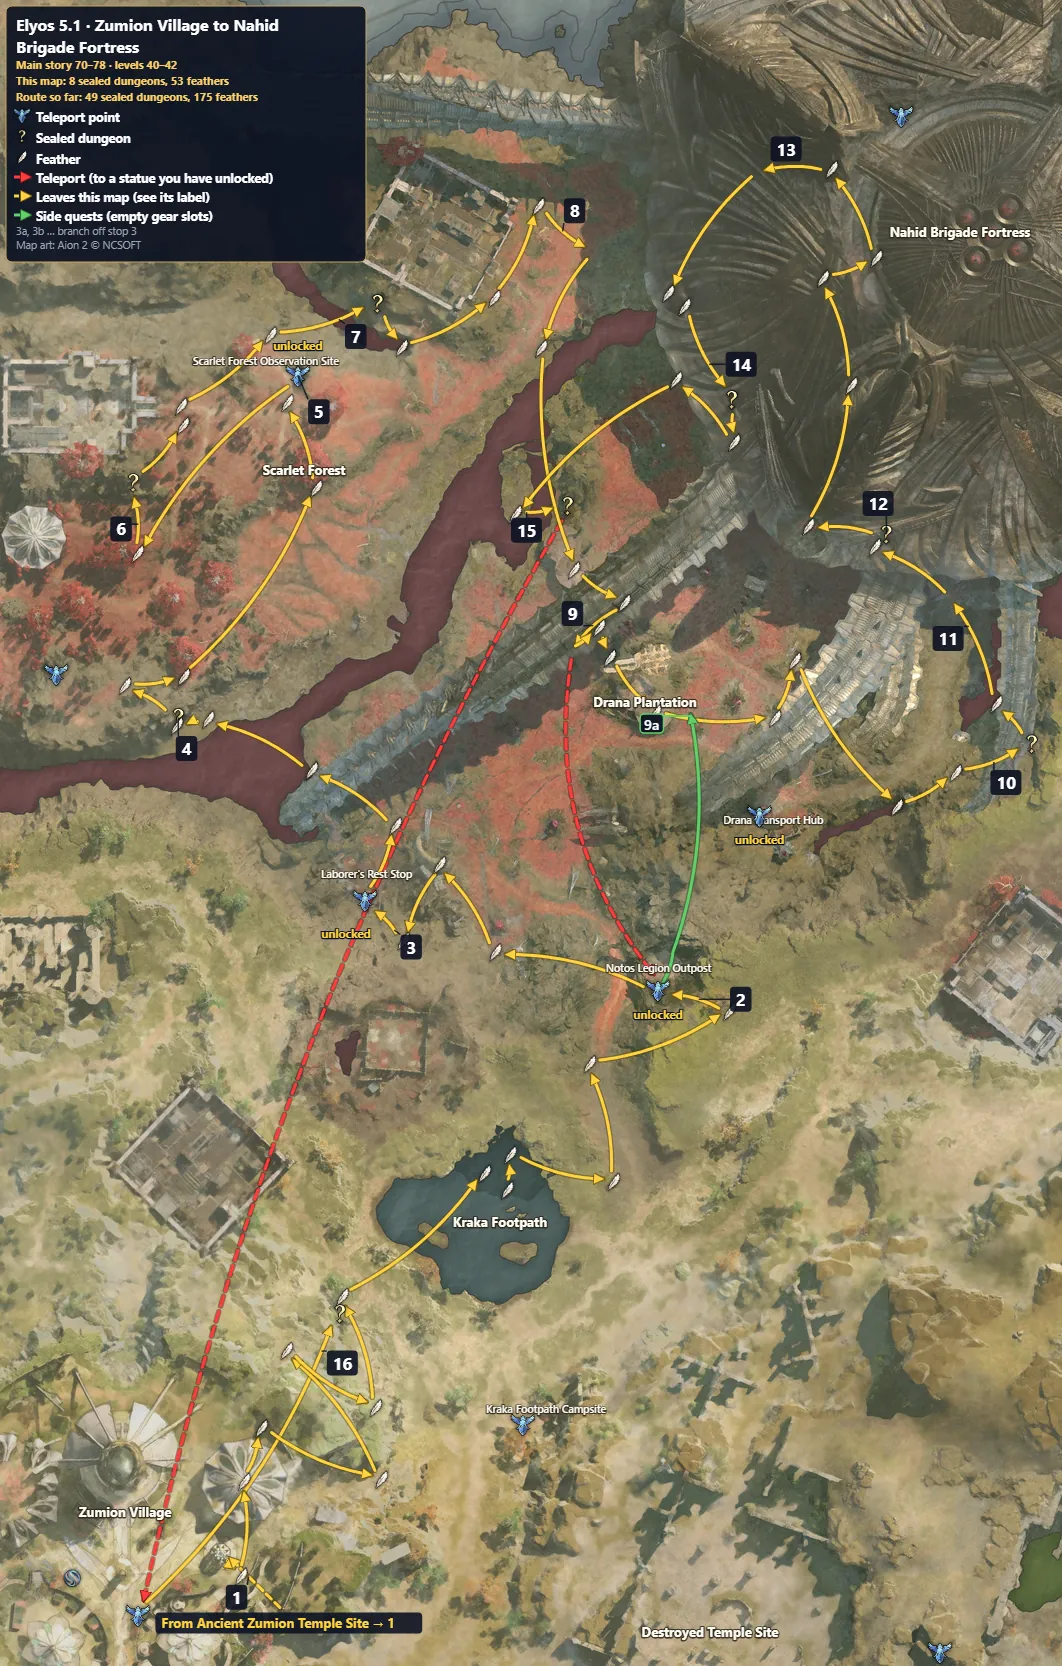
5.1 Zumion Village to Nahid Brigade Fortress
Green arrows are side quests, numbered after the yellow stop they branch from: 9a after stop 9. Pick them up on the way: they fill the Ascension Gauge, which the main story stops to wait on.
- Sealed dungeon: 2 Daevanion and 2 skill points each
- Feather
- Walk
- Side quest
- Teleport
Map 5.1's 16 steps as text
- Zumion Village — Where the Drana Flows: talk to Caelid. Unlocks the Notos Legion Outpost teleport.
- Notos Legion Outpost — Where the Drana Flows: talk to Kepillia. Unlocks the Laborer's Rest Stop teleport.
- Laborer's Rest Stop — Where the Drana Flows: talk to the Kobold Fertilizer Worker, talk to the Kobold Drudge, talk to the Kobold Gatherer, check the Power Tower Management Document Box, inject poison into Condensed Drana Root — Drana Cultivation Area, inject poison into Drana Sprout — Drana Cultivation Area, talk to Caelid — Notos Legion Outpost (back at step 2), hand in to Kepillia — Notos Legion Outpost. To the Scarlet Forest: pick up from Kepillia — Notos Legion Outpost, talk to Nania — Notos Legion Outpost.
- Dehinon's Hideout (sealed dungeon)
- Scarlet Forest Observation Site — To the Scarlet Forest: talk to the transformed legionnaire. Unlocks the Scarlet Forest Observation Site teleport. To the Scarlet Forest: check the Unidentified Corpse — Scarlet Forest, talk to Sthen, hand in to Caelid. Sowing Seeds of Chaos: pick up from Caelid, destroy the Drana Injector — Scarlet Forest, defeat Damaged Mutated Sura — Scarlet Forest, defeat Wandering Sura Warrior — Scarlet Forest, defeat Wandering Sura Ranger — Scarlet Forest, hand in to Sthen. Notos Legion Makeover: pick up from Sthen, collect the Balaur Language Manual from the General Goods Chest — Scarlet Forest, collect Mutated Forest Dratona tissue — Scarlet Forest, collect Scarlet Forest Dratona's bludgeon — Scarlet Forest.
- Grave of the Wrathful Dead (sealed dungeon) — Notos Legion Makeover: talk to Sthen — Scarlet Forest Observation Site (back at step 5), use the Language Artifact to learn — Scarlet Forest Observation Site.
- Krall Barracks (sealed dungeon) — Notos Legion Makeover: hand in to Sthen — Scarlet Forest Observation Site. Power Tower Sabotage: pick up from Sthen — Scarlet Forest Observation Site.
- Scarlet Forest — Power Tower Sabotage: eliminate the Scarlet Forest Krall. Teleport to Notos Legion Outpost. Power Tower Sabotage: talk to Kepillia — Notos Legion Outpost (back at step 2), talk to Nania — Notos Legion Outpost.
- Drana Processing Area — Power Tower Sabotage: talk to transformed Nania, hand in to Kepillia — Notos Legion Outpost. Thorough Preparation: pick up from Kepillia — Notos Legion Outpost, destroy Small Drana Repository, defeat Dracuni Gatherer, defeat Dracuni Processing Laborer, hand in to Kepillia — Notos Legion Outpost. Striving for a Purpose: pick up from Kepillia — Notos Legion Outpost, destroy the Plantation Large Totem, defeat Plantation Kobold Laborer, defeat Drana Watch Scout. Side quest First-mover Advantage (9a): pick up — Notos Legion Outpost. Side quest First-mover Advantage (9a): step 2: Collect Labor Manager Oculazen's Eye — Drana Cultivation Area. Side quest First-mover Advantage (9a): step 2: Collect Drana Processing Maintenance Machine's Rake. Side quest First-mover Advantage (9a): hand in — Notos Legion Outpost. Striving for a Purpose: go to Notos Legion Outpost — Notos Legion Outpost (back at step 2), hand in to Caelid — Notos Legion Outpost. Unpleasant Memories: pick up from Caelid — Notos Legion Outpost, talk to Kepillia — Notos Legion Outpost. Unlocks the Drana Transport Hub teleport. Unpleasant Memories: collect the waste — Drana Transport Hub, talk to Overseer Davian — Drana Transport Hub.
- Balaur Scouts Campsite (sealed dungeon)
- Drana Plantation — Unpleasant Memories: talk to the Access Control Officer Devisha.
- Cave of the Defeated (sealed dungeon)
- Nahid Brigade Fortress — Unpleasant Memories: go to the Nahid Disposal Plant, hand in to Caelid. A Balaur's Trash is a Daeva's Treasure: pick up from Caelid, talk to Caelid.
- Dratona Outpost (sealed dungeon)
- Laborer Training Ground (sealed dungeon) — Teleport to Zumion Village.
- Kraka's Altar (sealed dungeon) — A Balaur's Trash is a Daeva's Treasure: talk to Phernos — Zumion Village (back at step 1), talk to Caelid — Zumion Village, hand in to Dymones — Zumion Village.
| Gives | Side quest | Level | Arrow |
|---|---|---|---|
 Pilgrim Ring (Epic) | First-mover Advantage | 41 | 9a |
All mapsSee it on the interactive mapNext: 5.2 · Ancient Zumion Temple Site to Ardus Shrine Entrance →
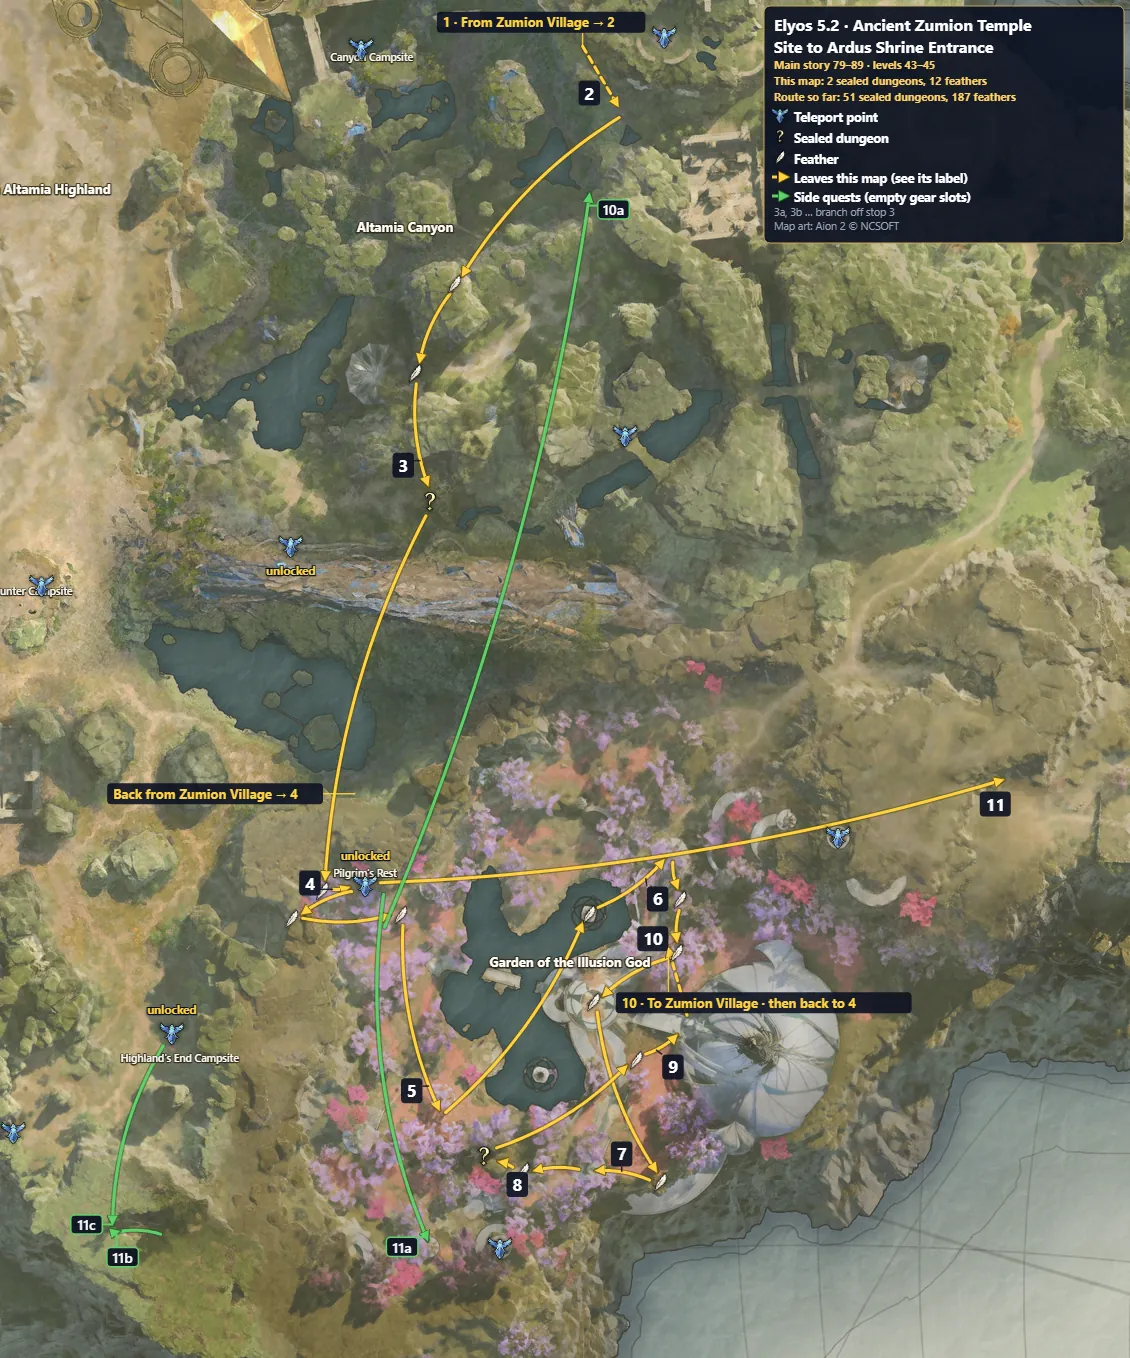
5.2 Ancient Zumion Temple Site to Ardus Shrine Entrance
Green arrows are side quests, numbered after the yellow stop they branch from: 10a after stop 10, 11a–11c after stop 11. Pick them up on the way: they fill the Ascension Gauge, which the main story stops to wait on.
- Sealed dungeon: 2 Daevanion and 2 skill points each
- Feather
- Walk
- Side quest
Monolith level 30: you pass 560 points (187 pickups) on this map. Its title, Saint of Verteron, gives Defense 300, Damage Tolerance 3% and Block 100 equipped.
Ascension gate after Draupnir: when your Ascension Gauge is full, the Ascension quest The One Who Witnesses the Nightmare opens; take it from the Journal's Ascension tab and complete it to go on with Witness to a Nightmare. Until the gauge is full, do nearby green side quests and sealed dungeons.
Map 5.2's 11 steps as text
- Zumion Village — Time Takes Its Toll: pick up from Dymones.
- Ancient Zumion Temple Site — Time Takes Its Toll: hand in to Phernos. A Means to an End: pick up from Phernos.
- Rift Cave (sealed dungeon) — Unlocks the Pilgrim's Rest teleport.
- Pilgrim's Rest — A Means to an End: hand in to Paitos. Pilgrims of the Garden: pick up from Paitos, talk to Dioni, talk to Nestor.
- Garden of the Illusion God — Pilgrims of the Garden: talk to Anteia, defeat Tainted Vine Specter, close the Rift Fissure, defeat Wandering Wind Spirit, hand in to Anteia. Another Rift: pick up from Anteia, talk to Nestor — Pilgrim's Rest, talk to Caelid — Pilgrim's Rest (back at step 4), hand in to Nestor — Pilgrim's Rest. Memories of the Garden: pick up from Nestor — Pilgrim's Rest, talk to Dorian, read the Oath.
- Garden of the Illusion God — Memories of the Garden: read the message.
- Garden of the Illusion God — Memories of the Garden: read the Proof of the Faith.
- Illusionary Ruins (sealed dungeon) — Memories of the Garden: read the Memory of the Seal — Garden of the Illusion God (back at step 5), hand in to Dorian — Garden of the Illusion God. The Path of Pilgrimage: pick up from Dorian — Garden of the Illusion God, talk to Nestor — Pilgrim's Rest (back at step 4), collect the Illusion Tree's Essence — Garden of the Illusion God, talk to Dioni — Pilgrim's Rest, recover belongings from the corpse — Garden of the Illusion God, recover belongings from the Garden Guardian — Garden of the Illusion God, recover belongings swallowed by the Wandering Dark Spirit — Garden of the Illusion God, recover belongings swallowed by the Wandering Water Spirit — Garden of the Illusion God, hand in to Dioni — Pilgrim's Rest. Sacred Offering: pick up from Dioni — Pilgrim's Rest, offer the essence to the Message Brazier — Garden of the Illusion God, offer the essence to the Oath Brazier — Garden of the Illusion God, offer the essence to the Seal Brazier — Garden of the Illusion God, offer the essence to the Faith Brazier — Garden of the Illusion God, hand in to Caelid — Ardus Shrine Entrance.
- Ardus Shrine Entrance — The Core of Illusion God: pick up from Caelid, hand in to Phernos. Diverging Paths: pick up from Phernos.
- Zumion Village — Diverging Paths: talk to Phernos, go to the residential area, talk to Nania, hand in to Dymones. Draupnir: pick up from Dymones. Unlocks the Scar of the Wind teleport. Draupnir: talk to Paitos — Pilgrim's Rest (back at step 4). Side quest Until I Hold You Again (10a): pick up — Pilgrim's Rest. Side quest Until I Hold You Again (10a): step 1: Retrieve Teina's Bracelet — Ardus Shrine Entrance. Side quest Until I Hold You Again (10a): step 2: Talk to Phernos — Pilgrim's Rest. Side quest Until I Hold You Again (10a): hand in — Altamia Canyon.
- Garden of the Illusion God — Draupnir: investigate Draupnir, talk to Paitos, talk to Edna. Teleport to Pilgrim's Rest. Witness to a Nightmare: hand in to Paitos — Pilgrim's Rest (back at step 4). Side quest Destroyed Monument (11a): pick up — Pilgrim's Rest. Side quest Destroyed Monument (11a): step 2: Talk to Marwell. Side quest Destroyed Monument (11a): step 5: Collect Earth Spirit's rock. Side quest Destroyed Monument (11a): step 5: Collect Wind Spirit's crystal. Side quest Destroyed Monument (11a): step 5: Collect Illusion Tree's Essence. Side quest Destroyed Monument (11a): step 6: Talk to Marwell. Side quest Zumion's Call: Part One (11b): step 4: Go to the Sacrifice's Rest — Southern Altamia Highland. Side quest Zumion's Call: Part One (11b): hand in — Southern Altamia Highland. Side quest Zumion's Call: Part Two (11c): pick up — Southern Altamia Highland. Side quest Zumion's Call: Part Two (11c): hand in — Southern Altamia Highland.
| Gives | Side quest | Level | Arrow |
|---|---|---|---|
| Clash Rune Chest | Zumion's Call: Part Two | 37 | 11c |
 Pilgrim Earrings (Epic) | Destroyed Monument | 45 | 11a |
 Pilgrim Necklace (Epic) | Until I Hold You Again | 45 | 10a |
Reached level 45? Gear score is next: the gear score guide takes both factions from 700 to 3,000.
Alt leveling route: Elyos, no feathers
For a second character on your main’s server: the same maps, story, sealed dungeons and side quests as the route above, without the feathers. Your server’s feathers are synced at the Monolith, so go straight from one numbered stop to the next and pass the feathers and the arrows’ detours to them. What the alt earns at levels 10 and 16, and what to claim before you delete it: the alt rewards guide.
- Levels 1–10: the Poeta tutorial, as for a main.
- Maps 1.1–1.2, levels 10–16: follow the numbers and skip 23 feathers. Map 1.2, step 8 (Dawn Legion Base): at the Monolith, Sync Empyrean Traces first. The button, at the bottom left of the Monolith window, brings over every feather your server has collected.
- Map 2, levels 18–22: follow the numbers and skip 19 feathers. Map 2, steps 16–17: Wind Breeze Merchants, level 22. This quest opens Expeditions and your alt’s Odyle; the level alone does not. From then its Odyle fills while you play your main: 15 every 3 hours, up to 560, or 840 with membership.
- Maps 3.1–5.2, levels 24–45: follow the numbers and skip 145 feathers.
- Level 45: ready to farm. At 700 gear score your alt can claim Conquest 1★, at 1,400 Conquest 2★: see the alts guide’s level 45 steps, and the gear score guide for the climb.
Levels 1–10: just follow the main story through the Ishalgen tutorial; there are no side quests, feathers or sealed dungeons there. The maps start at level 10.
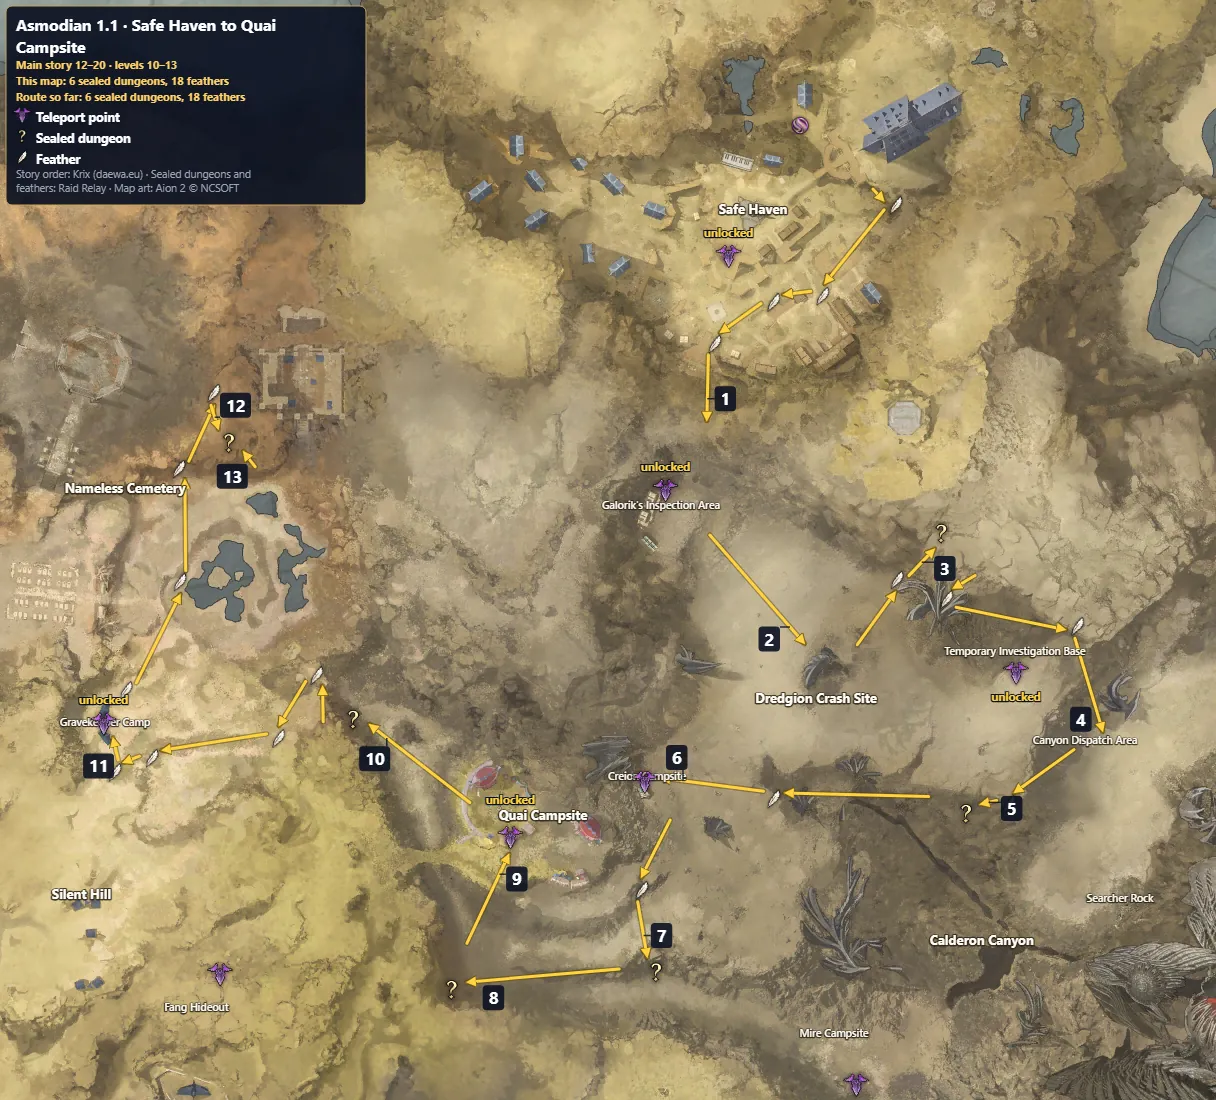
1.1 Safe Haven to Quai Campsite
- Feather cluster: take every magenta feather in the ring
- Sealed dungeon: 2 Daevanion and 2 skill points each
- Feather
- Walk
Monolith level 10: you pass 70 points (24 pickups) on this map. Its title, Altgard Inquirer, gives 1.6% movement speed equipped.
Map 1.1's 13 steps as text
- Safe Haven — Finding Nemon: talk to Hans, check the Supply Chest. Survival Supplies: go to VeKauf. Gathering Essentials: talk to Markan. Crash Site Rendezvous: talk to Hadala.
- Dredgion Crash Site — Crash Site Rendezvous: collect Red Shell Mole shell, talk to Matir.
- Treasure Hunter's Residence (sealed dungeon)
- Dredgion Crash Site — Contaminated Area: talk to Niror, talk to Keller.
- Trickster's Den (sealed dungeon)
- Creion Campsite — Express Daeva Delivery: retrieve the Lost Supplies.
- Smuggler's Cave (sealed dungeon)
- Watcher's Temporary Outpost (sealed dungeon)
- Quai Campsite — Veiled Truth: go inside, talk to Baba, go to Barvir, talk to Barvir.
- Dusk Pit (sealed dungeon)
- Gravekeeper Camp — Urgent Pursuit: talk to Tagar, defeat Corrupted Karas Handmaiden, defeat Hungry Dead. Cemetery Cleanup: talk to Ulgorn, talk to Tagar.
- Poisonous Plant Habitat — Cemetery Cleanup: defeat Vampire Vivel, defeat Rafflesia.
- Poisonous Plant Habitat
All mapsSee it on the interactive mapNext: 1.2 · Nameless Cemetery to Safe Haven →
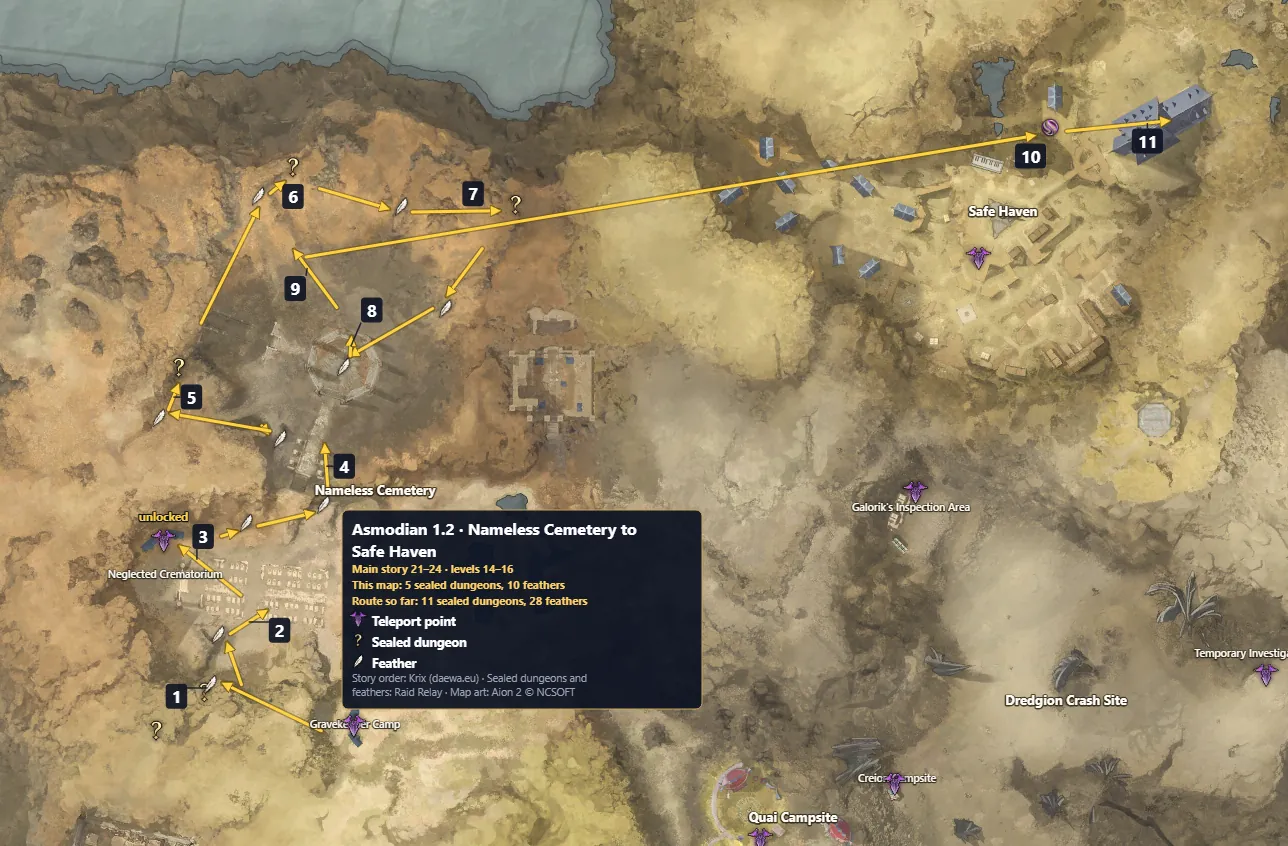
1.2 Nameless Cemetery to Safe Haven
- Feather cluster: take every magenta feather in the ring
- Sealed dungeon: 2 Daevanion and 2 skill points each
- Feather
- Walk
Must clear: Lost Ruin (step 6). Do not skip it: many later sealed dungeons depend on it, and the Latrima Outpost garrison opens only after it.
Map 1.2's 11 steps as text
- Old Graveyard (sealed dungeon)
- Nameless Cemetery — Back on the Scent: investigate Brok's traces on the corpse, defeat the quest target, defeat Lost Specter.
- Neglected Crematorium — Dead Men Tell No Tales: talk to Ulgorn.
- Nameless Cemetery
- Ossuary of the Noble (sealed dungeon)
- Lost Ruin (sealed dungeon)
- Hidden Vein Cave (sealed dungeon)
- Nameless Cemetery — Dead Men Tell No Tales: defeat Evil Black Soul, defeat Grudge Bearing Warrior, talk to the hiding man.
- Nameless Cemetery
- Altgard Monolith (Monolith) — Empyrean Monolith: talk to Ollen, retrieve the Empyrean Trace: Altgard, obtain the Revelation Amulet Enhance Scroll.
- Shadow Hall — Empyrean Monolith: talk to Nemon. Back in Safe Haven: hand in your feathers at the Altgard Monolith (Krix: about 150 by now) and equip the movement-speed title.
| Gives | Side quest | Level |
|---|---|---|
| Clash Rune Chest | Hugo Mercenaries: Past and Present, then Hugo Mercenaries: Deep Shadow, then Hugo Mercenaries: An Old Promise | 16–32 |
All mapsSee it on the interactive mapNext: 2.1 · Shadow Hall →
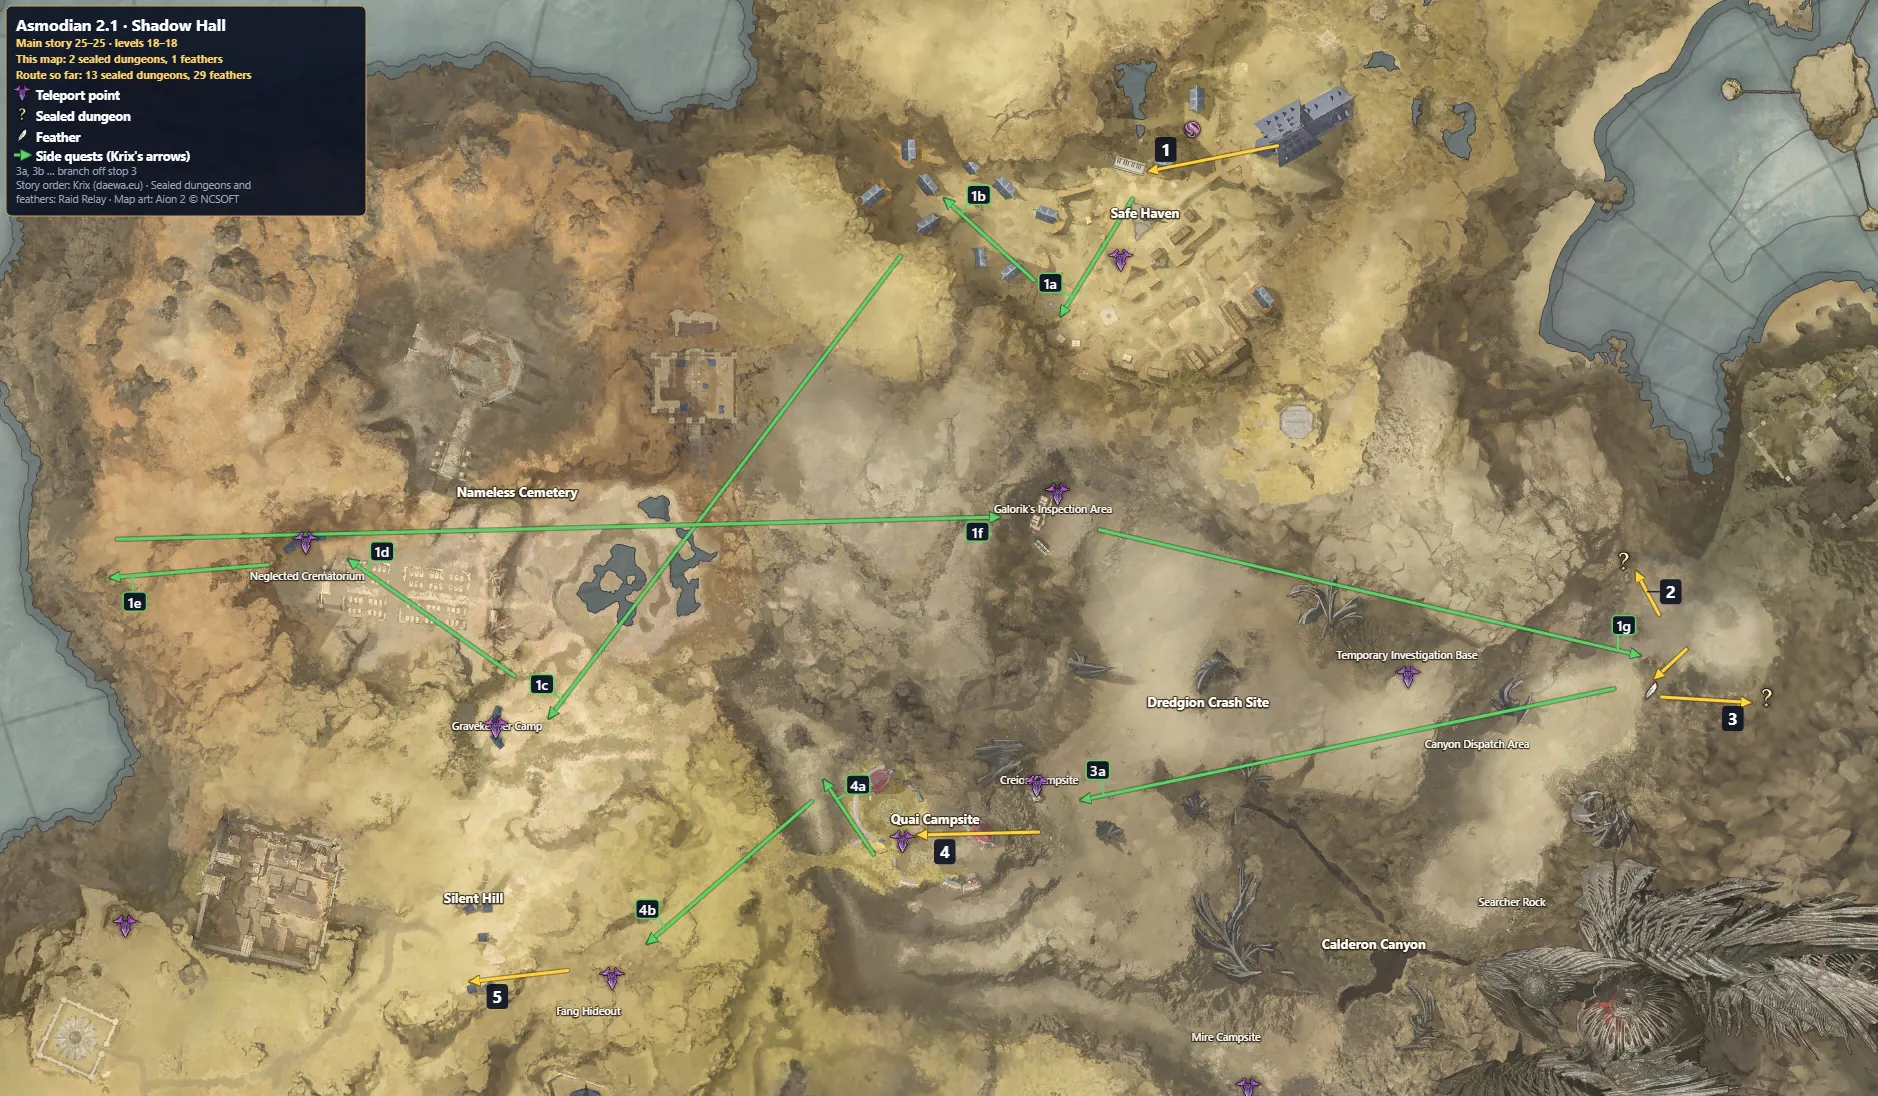
2.1 Shadow Hall
Green arrows are side quests, numbered after the yellow stop they branch from: 1a–1g after stop 1, 3a after stop 3, 4a–4b after stop 4. Pick them up on the way: they fill the Ascension Gauge, which the main story stops to wait on.
- Sealed dungeon: 2 Daevanion and 2 skill points each
- Feather
- Walk
- Side quest
Map 2.1's 5 steps as text
- Safe Haven — A New Lead: check the Worn Chest.
- Dratona Cave (sealed dungeon)
- Valka's Nest (sealed dungeon)
- Quai Campsite — A New Lead: talk to Baba.
- Silent Hill — A New Lead: collect the supplies stolen by marauders.
All mapsSee it on the interactive mapNext: 2.2 · Fang Hideout to Sanctum Dumpsite →
2.2 Fang Hideout to Sanctum Dumpsite
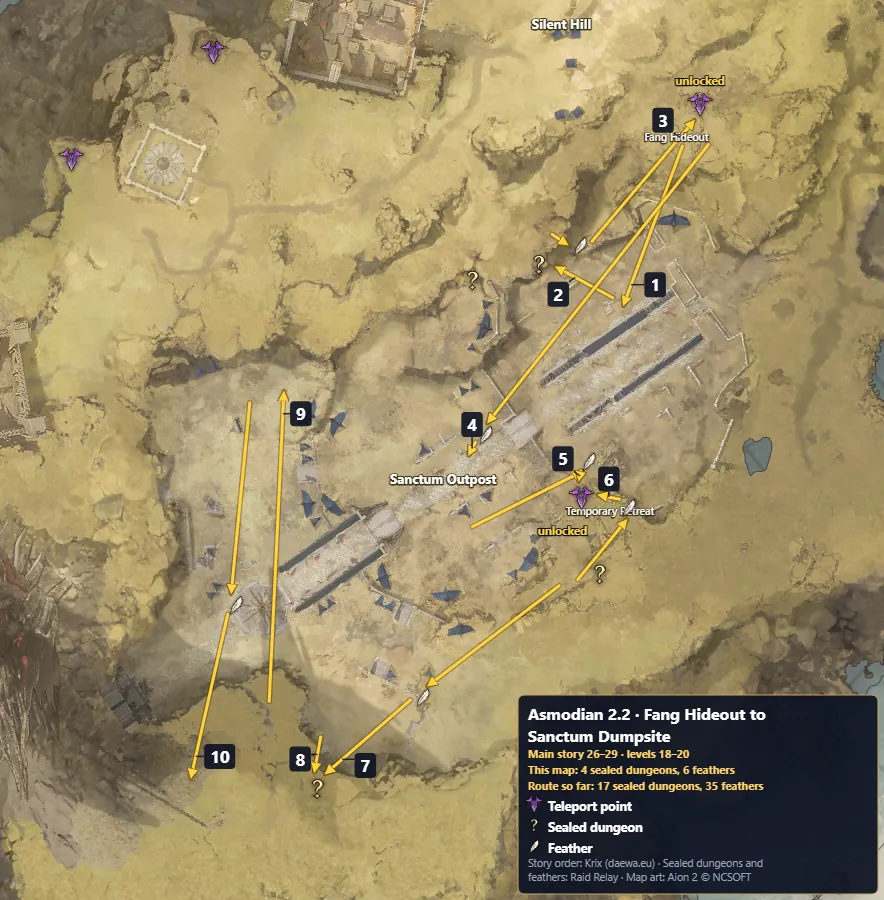
- Sealed dungeon: 2 Daevanion and 2 skill points each
- Feather
- Walk
Map 2.2's 10 steps as text
- Sanctum Outpost — Malice Laid Bare: collect the Draconute Superior Soldier's weapon, collect the Draconute Tinkerer's tissue sample.
- Fafnite Storage (sealed dungeon)
- Fang Hideout — Malice Laid Bare: enter the captive's prison cell, talk to Menrik. Broken Fang: talk to Ulgorn.
- Sanctum Outpost — Broken Fang: talk to Draconute Warrior, talk to Draconute Ranger, talk to Draconute Superior Combatant, collect the eyes from Outpost Probe.
- Temporary Retreat — Broken Fang: talk to Ulgorn, talk to Gamilla. Watchful Eyes: talk to Gamilla.
- Temporary Retreat (sealed dungeon)
- Fanatics' Den (sealed dungeon) — Watchful Eyes: check for survivors. Imminent Threat: talk to Ulgorn.
- Fanatics' Den
- Sanctum Outpost — Watchful Eyes: obtain the key.
- Sanctum Outpost — Imminent Threat: talk to Ulgorn, examine the Monolith.
All mapsSee it on the interactive mapNext: 2.3 · Watcher's Tent to Odar's Shade →
2.3 Watcher's Tent to Odar's Shade
Green arrows are side quests, numbered after the yellow stop they branch from: 1a after stop 1, 2a after stop 2, 4a–4c after stop 4. Pick them up on the way: they fill the Ascension Gauge, which the main story stops to wait on.
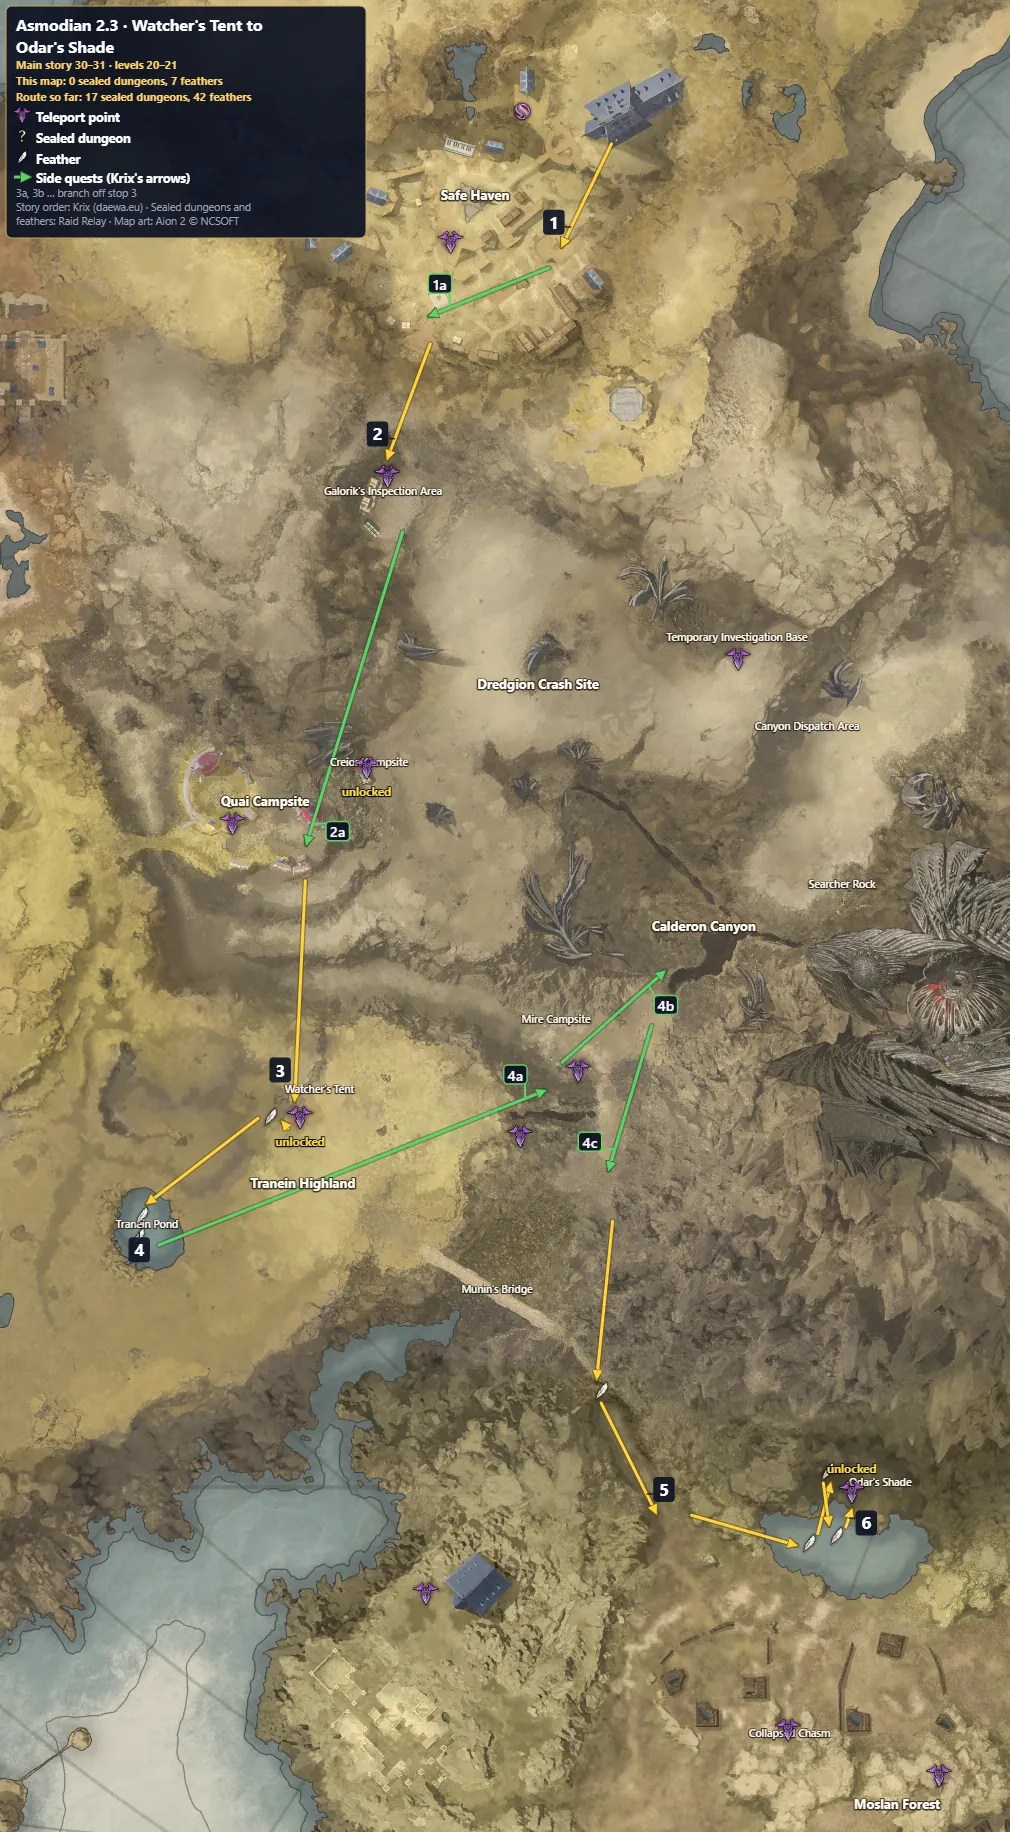
- Feather cluster: take every magenta feather in the ring
- Feather
- Walk
- Side quest
Map 2.3's 6 steps as text
- Safe Haven
- Galorik's Inspection Area — Crossroad: talk to Nemon.
- Watcher's Tent — Crossroad: go to the Watcher's Tent, talk to Nemon.
- Tranein Pond — Crossroad: defeat the Balaur.
- Moslan Forest — Creeping Shadow: go to Moslan Forest, talk to Nemon.
- Odar's Shade — Creeping Shadow: go to Odar's Shade, talk to Young Elim Nana, search for Elim survivor, search for Nornir survivors, examine the Nornir Corpse, defeat the Blades nearby.
All mapsSee it on the interactive mapNext: 3.1 · Collapsed Chasm to Odar's Shade →
3.1 Collapsed Chasm to Odar's Shade
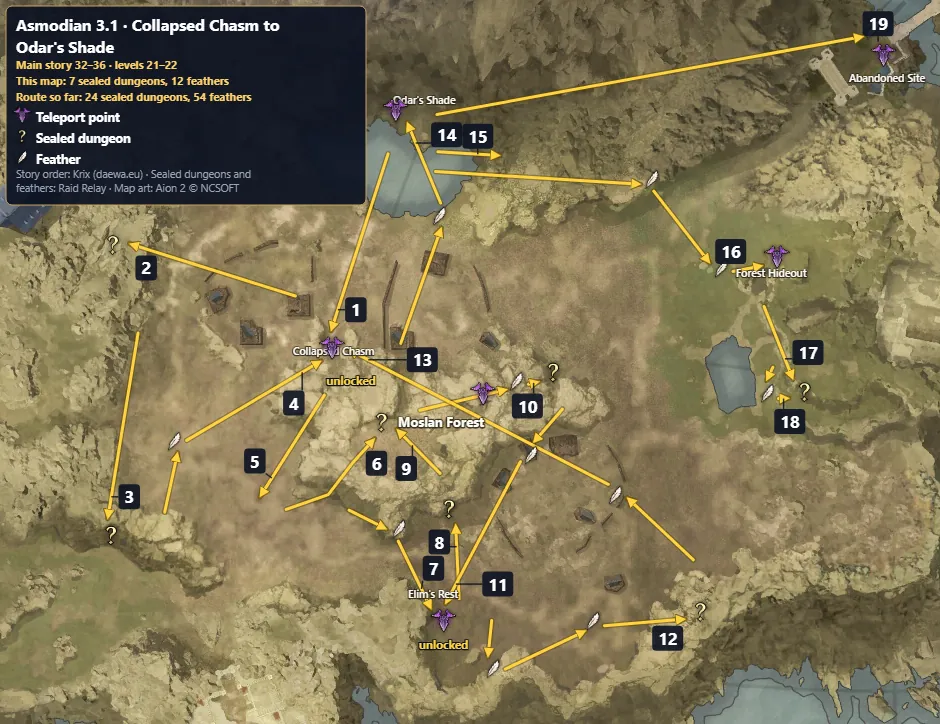
- Feather cluster: take every magenta feather in the ring
- Sealed dungeon: 2 Daevanion and 2 skill points each
- Feather
- Walk
Monolith level 20: you pass 235 points (79 pickups) on this map. Its title, Guardian of Altgard, gives PvE Damage Boost 3% and Penetration 210 equipped.
Ascension gate after Verdant Melody: when your Ascension Gauge is full, the Ascension quest The One Who Hears the Voice opens; take it from the Journal's Ascension tab and complete it to go on with Daeva in a Dream. Until the gauge is full, do nearby green side quests and sealed dungeons.
Map 3.1's 19 steps as text
- Collapsed Chasm — Children of the Elim: talk to Ninir. In the Elims' Name: talk to Ninir.
- Abandoned Archon Jail (sealed dungeon)
- Prison of Oblivion (sealed dungeon)
- Collapsed Chasm
- Moslan Forest — Children of the Elim: defeat Ashen Ursus, collect the Forest Essence, defeat Black Ash Basilisk, go to where the Young Elim may be, search the the quest target, talk to Nemon.
- Victims' Cave
- Elim's Rest — Children of the Elim: go to Elim's Rest. In the Elims' Name: search for the young Elim with Nemon.
- Library of Foresight (sealed dungeon)
- Victims' Cave (sealed dungeon)
- Fortuneteller's Grave (sealed dungeon)
- Elim's Rest
- Howling Den
- Collapsed Chasm
- Odar's Shade — In the Elims' Name: go to Odar's Shade. Verdant Melody: talk to Ecco.
- Moslan Forest — Verdant Melody: rescue Ecco the Forest Spirit.
- Forest Hideout
- Bloodsoaked Confessional (sealed dungeon) — Disturbed Balance: go to Krao Cave Entrance, talk to Ecco, investigate Krao Cave.
- Bloodsoaked Confessional
- Abandoned Site
All mapsSee it on the interactive mapNext: 3.2 · Abandoned Site to Nornir Assembly →
3.2 Abandoned Site to Nornir Assembly
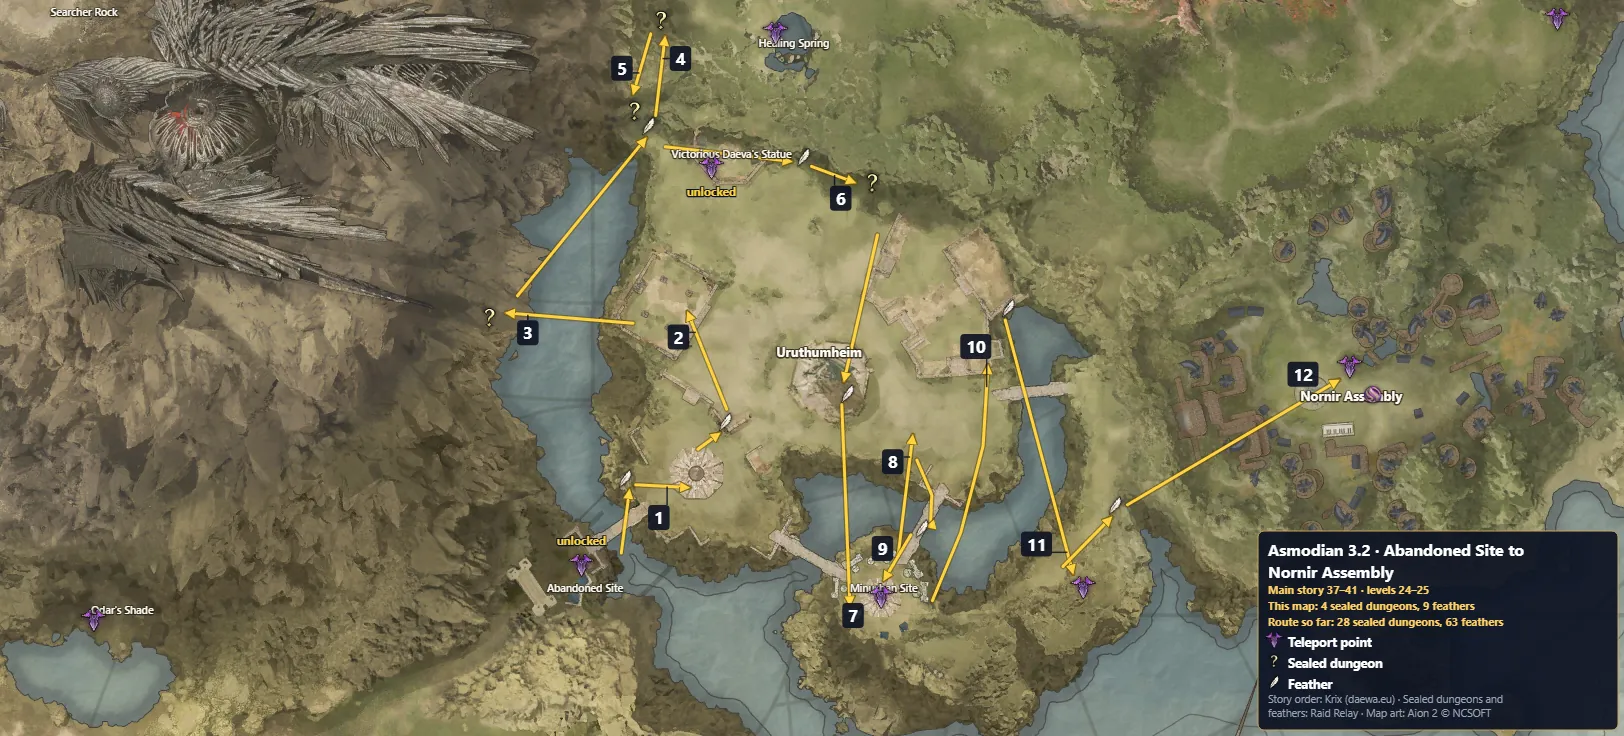
- Sealed dungeon: 2 Daevanion and 2 skill points each
- Feather
- Walk
Map 3.2's 12 steps as text
- Uruthumheim — Searching for Survivors: go to the Abandoned Site, talk to Nemon, defeat the Blades, examine the Nornir Supply Chest.
- Uruthumheim — Prison Break: rescue the prisoners.
- Abandoned Memorial Room
- Lamnah Base (sealed dungeon)
- Closed Hideout
- Worshiper's Underground Cave
- Minushan Site
- Uruthumheim — Finding Stolen Relics: retrieve the History of Uruthumheim, retrieve the Golden Uruthum Statue, retrieve the Fragment of Minusha's Heart.
- Minushan Site
- Uruthumheim — Voice of Rage: defeat the Balaur in front of the Eastern Altar, defeat Mind-Controlled Ancient Soldier and Ranger, destroy the the quest target, join Gohok in front of the Eastern Altar.
- Uruthumheim Cliff — Tangled Past: talk to Nemon.
- Nornir Assembly — Tangled Past: go to Nornir Assembly, talk to Nemon. Krix clears no more sealed dungeons until level 45 after these.
All mapsSee it on the interactive mapNext: 3.3 · Nornir Assembly to Battlescar Mound →
3.3 Nornir Assembly to Battlescar Mound
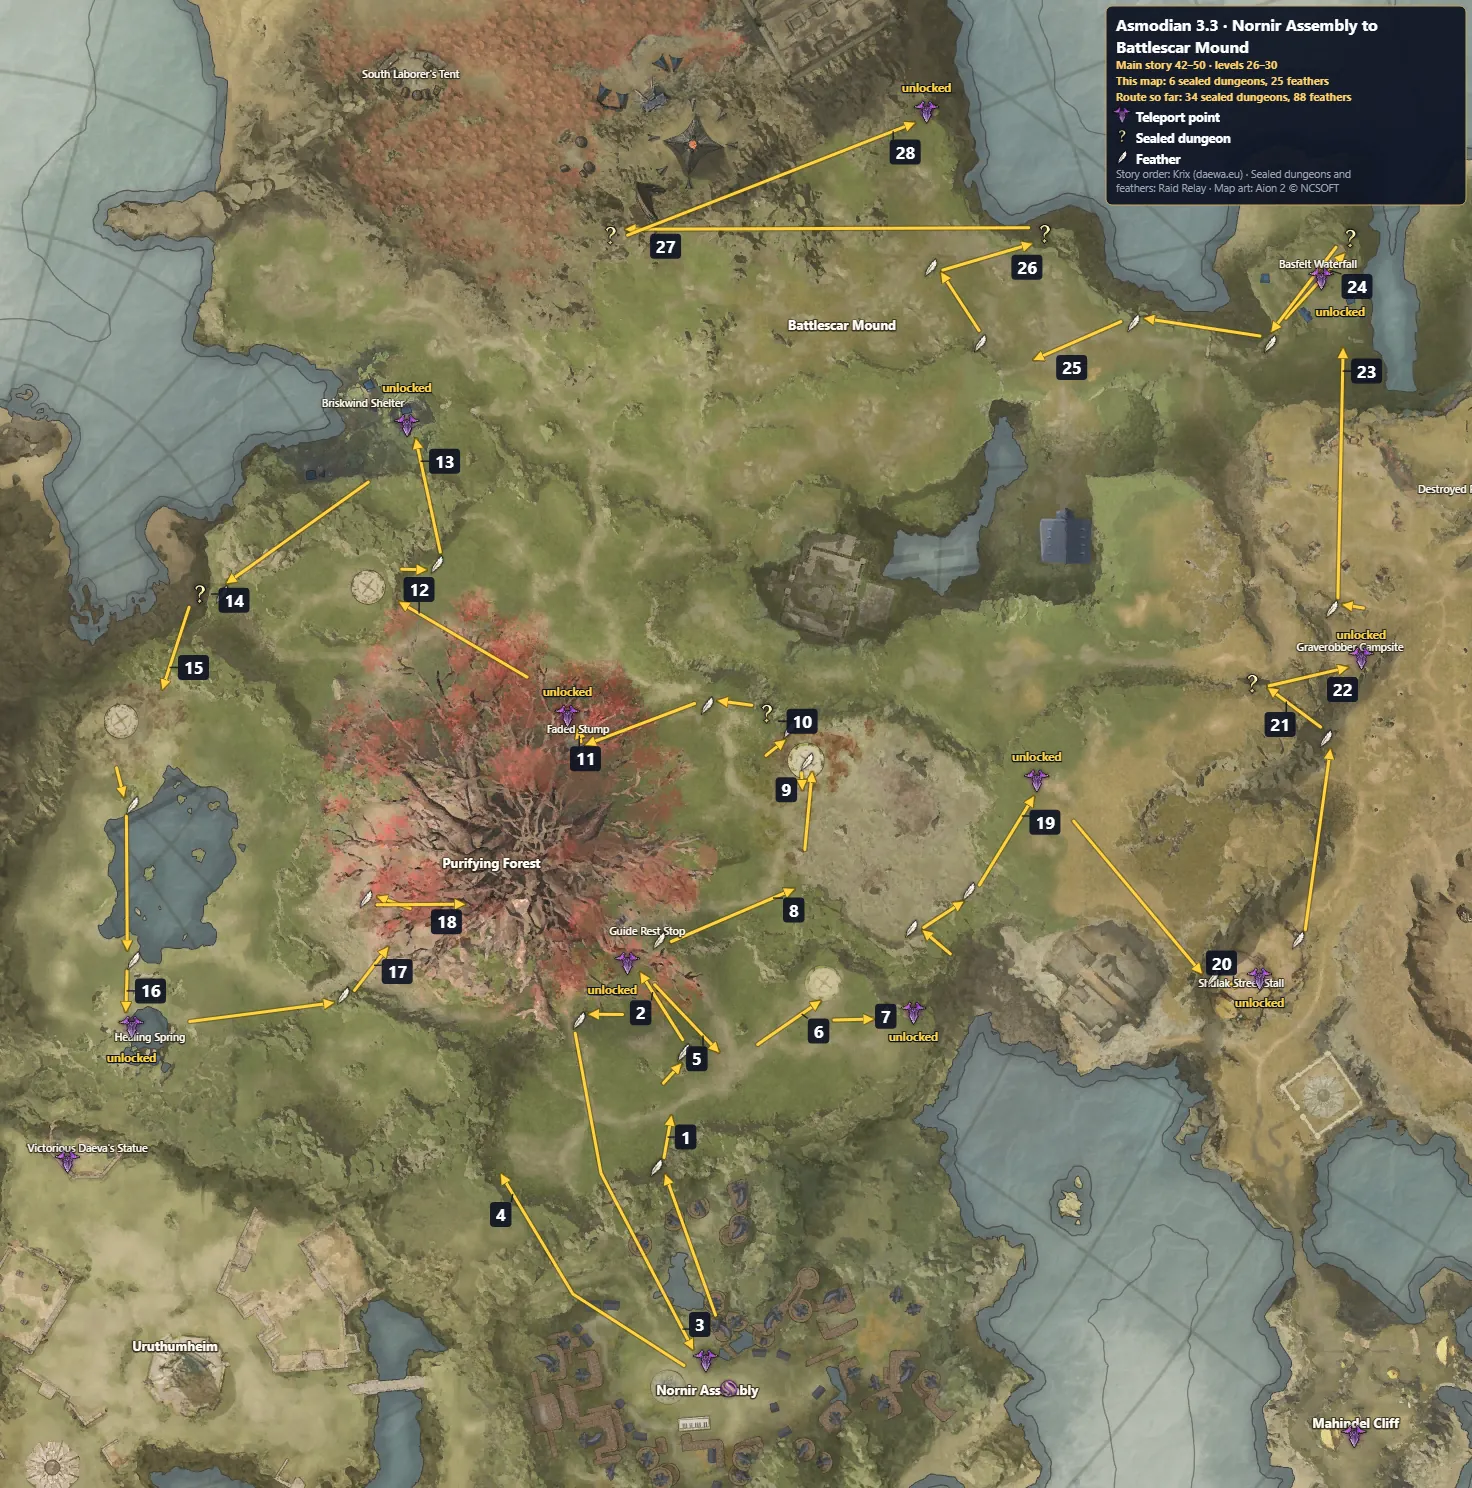
- Sealed dungeon: 2 Daevanion and 2 skill points each
- Feather
- Walk
Map 3.3's 28 steps as text
- Purifying Forest — Striving for Coexistence: gather antidote ingredients. Preparations for Restoration: defeat the contaminated spirits, remove Poison Blood Clot.
- Guide Rest Stop (teleport here) — A Collective Effort: talk to Ulgorn, talk to Zaksen.
- Nornir Assembly — Striving for Coexistence: talk to Varron. Preparations for Restoration: talk to Ulgorn, talk to Hadala, talk to Urd, talk to Hallina. The Past Revealed: talk to Urd, talk to Varron, talk to Hallina.
- Purifying Forest
- Purifying Forest
- Wind Altar — A Collective Effort: purify the Wind Altar, talk to Hadala.
- Purifying Forest Coastal Cliff (teleport here)
- Purifying Forest — A Collective Effort: eliminate the Rift Fragment, remove the Vines Corroded by Poison Blood.
- Purifying Forest — A Collective Effort: purify the Fire Altar, talk to Ulgorn.
- Destroyed Scriptorium (sealed dungeon)
- Faded Stump (teleport here)
- Purifying Forest — Land of Rifts: remove the quest target, defeat the quest target, purify the Earth Altar.
- Briskwind Shelter (teleport here)
- Unstable Cave (sealed dungeon)
- Purifying Forest — Dying Light: purify the Water Altar, talk to Nemon, remove the quest target.
- Healing Spring — Dying Light: talk to Nemon.
- Purifying Forest — Dying Light: remove Contaminated Root.
- Root of the Sacred Tree Entrance — Contaminated Sacred Tree: talk to Grisilla, enter the Root of the Sacred Tree, talk to Nemon.
- Purifying Forest Sunny Hill (teleport here)
- Shulak Street Stall (teleport here)
- Dratona Rally Point (sealed dungeon)
- Graverobber Campsite (teleport here)
- Basfelt Waterfall (teleport here)
- Final Haven (sealed dungeon)
- Battlescar Mound — Canyon's Secret: talk to Dinoh, investigate the Urugugu Canyon.
- All-Curing Cave (sealed dungeon)
- Drana Depository (sealed dungeon)
- Battlescar Mound Clifftop (teleport here)
| Gives | Side quest | Level |
|---|---|---|
| Clash Rune Chest | The Future Within the Past | 30 |
All mapsSee it on the interactive mapNext: 3.4 · Briskwind Shelter to Hidden Cave →
3.4 Briskwind Shelter to Hidden Cave
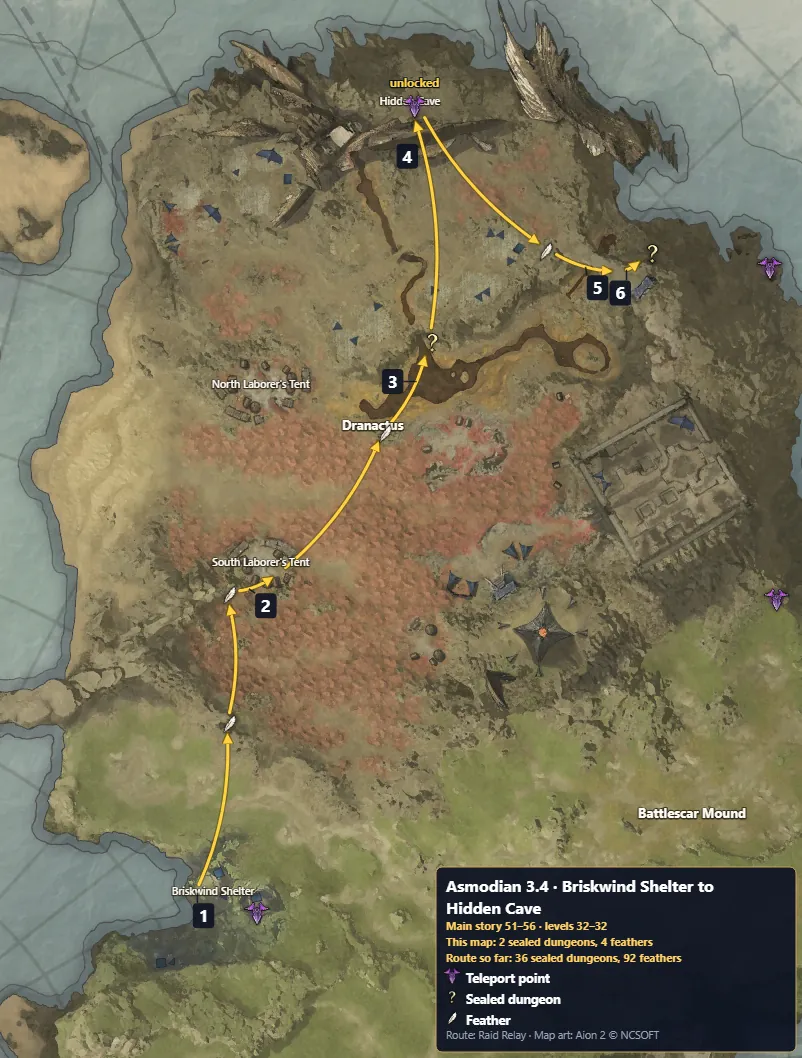
- Feather cluster: take every magenta feather in the ring
- Sealed dungeon: 2 Daevanion and 2 skill points each
- Feather
- Walk
Ascension gate after Last of the Destruction Archons: when your Ascension Gauge is full, the Ascension quest The One Who Dreams opens; take it from the Journal's Ascension tab and complete it to go on with A Daeva Dreaming Anew. Until the gauge is full, do nearby green side quests and sealed dungeons.
Map 3.4's 6 steps as text
- Briskwind Shelter — Bitter Reality: talk to Menrik, talk to Petra, talk to Bjorik, talk to Nemon, use the Language Artifact to learn, hand in to Menrik. Eye of the Red Tower: pick up from Menrik, defeat Mumu Worker — Dranactus.
- South Laborer's Tent — Eye of the Red Tower: read the Overseer's Manual, collect the Tarzel from the food chest, talk to Laborer Holta, talk to Laborer Teak, hand in to Menrik — North Laborer's Tent. The Survivors: pick up from Menrik — North Laborer's Tent, defeat Enhanced Dratona — Dranactus, defeat the quest target — Dranactus.
- Twisted Pit (sealed dungeon) — The Survivors: hand in to Menrik — Briskwind Shelter. Rescue Operation: pick up from Menrik — Briskwind Shelter.
- Dranactus — Rescue Operation: steal armor from Draconute Patrol, steal weapons from Draconute Sentinel, search for food and recovery potions from the supply chest. Unlocks the Hidden Cave teleport. Rescue Operation: join with Menrik — Hidden Cave, search for the patrol log, collect tissue samples from Black Claw Mau Brawler, hand in to Ulgorn — Hidden Cave. Last of the Destruction Archons: pick up from Ulgorn — Hidden Cave.
- Dranactus — Last of the Destruction Archons: go to the entrance of the underkeep.
- Skurv Laborer Den (sealed dungeon) — Last of the Destruction Archons: talk to Nemon — Dranactus (back at step 5). Teleport to Briskwind Shelter. Last of the Destruction Archons: talk to Ulgorn — Briskwind Shelter (back at step 1), talk to Menrik — Briskwind Shelter, check how Reuben is doing — Briskwind Shelter, hand in to Nemon — Briskwind Shelter. A Daeva Dreaming Anew: hand in to Nemon — Briskwind Shelter. After this third ascension, take the Hugo Mercenaries side quest in Briskwind Shelter for the second rune (Krix).
| Gives | Side quest | Level |
|---|---|---|
 Avenger Bracelet (Epic) | Pain Unending | 32 |
All mapsSee it on the interactive mapNext: 4.1 · Basfelt Waterfall to Shulak Street Stall →
4.1 Basfelt Waterfall to Shulak Street Stall
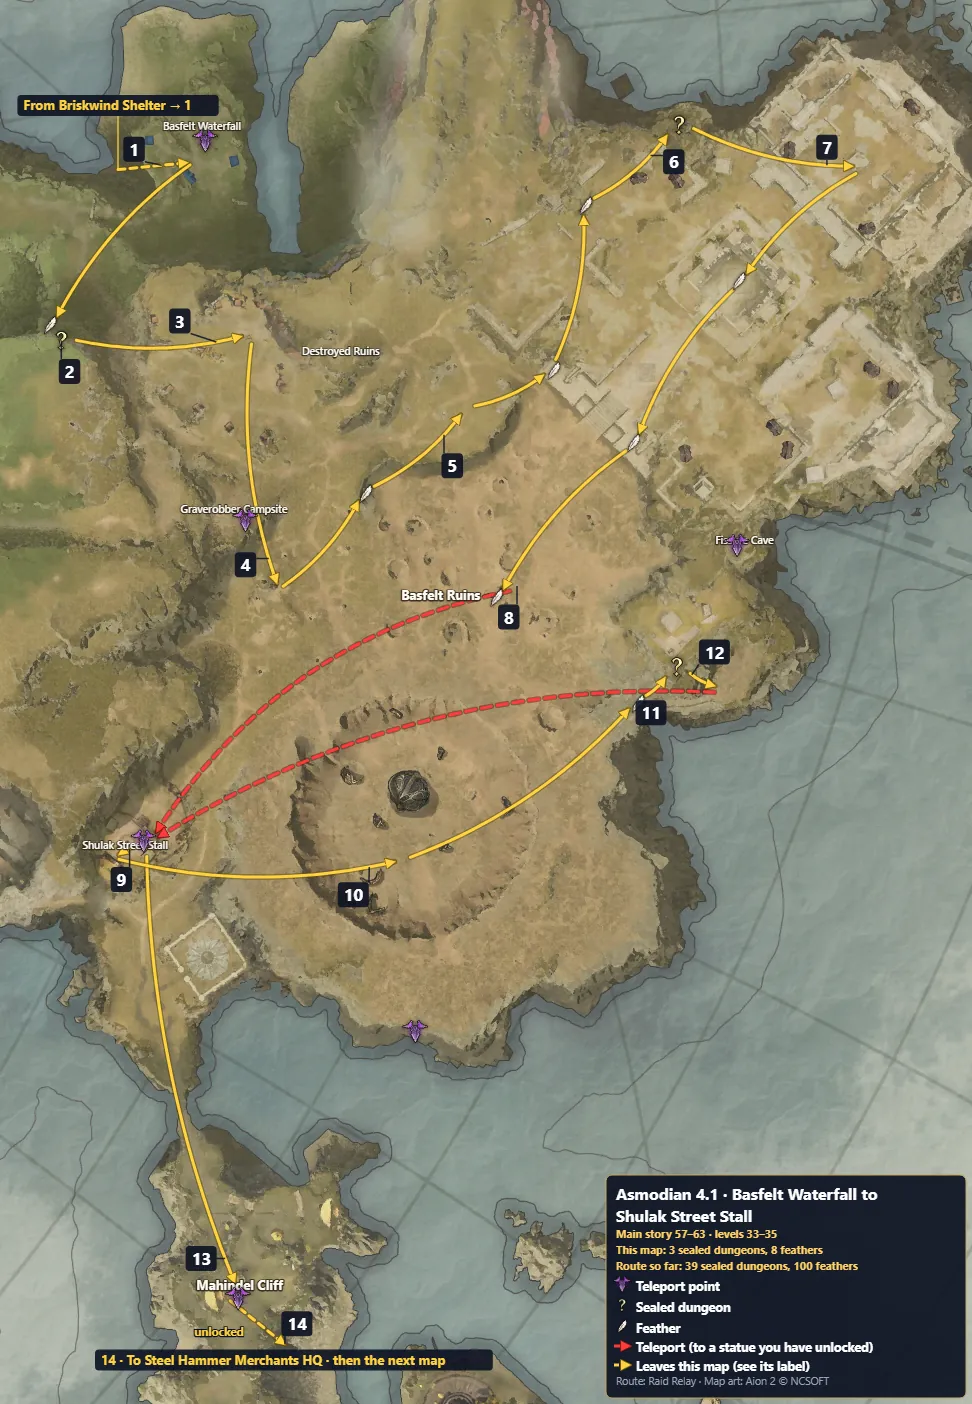
- Sealed dungeon: 2 Daevanion and 2 skill points each
- Feather
- Walk
- Teleport
Map 4.1's 14 steps as text
- Basfelt Waterfall — Last Refuge: go to Basfelt Waterfall, talk to Ulgorn, talk to Balla, talk to Varatul, talk to Chedan, talk to Nemon.
- Rift Fissure (sealed dungeon)
- Basfelt Ruins — Last Refuge: investigate the marauder goods chest, retrieve antiques from Marauder Watcher, retrieve loot from Marauder Brawler, talk to Chedan — Graverobber Campsite, talk to Dixie — Graverobber Campsite, talk to Dufaux — Graverobber Campsite, talk to Nemon at the Graverobber Campsite — Graverobber Campsite, hand in to Nemon. Scripture in the Ruins: pick up from Nemon, talk to Nemon at the Graverobber Campsite — Graverobber Campsite, talk to Dixie — Graverobber Campsite, talk to Hevid — Graverobber Campsite, talk to Dufaux — Graverobber Campsite, talk to Nemon — Graverobber Campsite.
- Basfelt Ruins — Scripture in the Ruins: retrieve Azphel Statue from the Loot Chest, retrieve the stolen chalice from Marauder Ranger, retrieve the stolen pendant from Marauder Warrior, hand in to Ulgorn — Graverobber Campsite. Blood Monument: pick up from Ulgorn — Graverobber Campsite, talk to Dixie — Graverobber Campsite, defeat Ruin Agrint, recover belongings of Dixie's fallen comrade.
- Basfelt Ruins — Blood Monument: defeat Ferocious Cadaver Cleaner, talk to Nemon — Destroyed Ruins, operate the Blood Monument — Destroyed Ruins, hand in to Nemon — Destroyed Ruins. Impending Threat: pick up from Nemon — Destroyed Ruins, destroy the quest target.
- Insectoid Tunnel (sealed dungeon)
- Basfelt Ruins — Impending Threat: stealthily capture a prisoner, defeat the ruins Blades, hand in to Nemon — Fissure Cave. Visible Trap: pick up from Nemon — Fissure Cave.
- Basfelt Ruins — Visible Trap: defeat the quest target, defeat Blades Messenger. Teleport to Shulak Street Stall.
- Shulak Street Stall — Visible Trap: talk to Purakhi.
- Basfelt Ruins — Visible Trap: retrieve the unexploded bomb, collect the Soulless Archon Armor.
- Library of Patience (sealed dungeon) — Visible Trap: hand in to Nemon — Shulak Street Stall. Destruction Archon Underground Fortress: pick up from Nemon — Shulak Street Stall.
- Basfelt Ruins — Destruction Archon Underground Fortress: go to the entrance of the Underground Fortress, talk to Nemon, hand in to Nemon — Shulak Street Stall. Enemy Territory: pick up from Nemon — Shulak Street Stall. Teleport to Shulak Street Stall. Unlocks the Mahindel Cliff teleport.
- Mahindel Cliff — Enemy Territory: talk to Sculkhi.
- Steel Hammer Merchants HQ — Enemy Territory: talk to Nemon, talk to Seikhi. Unlocks the Steel Hammer Merchants HQ teleport. Enemy Territory: talk to Brokhi, talk to Merchant Chief Crobakhi, hand in to Mannikiki — Steel Hammer Workcamp.
| Gives | Side quest | Level |
|---|---|---|
 Avenger Earrings (Epic) | Traveling Merchant's Conundrum | 33 |
 Avenger Ring (Epic) | Finders Keepers | 33 |
All mapsSee it on the interactive mapNext: 4.2 · Steel Hammer Workcamp to Idun's Lake →
4.2 Steel Hammer Workcamp to Idun's Lake
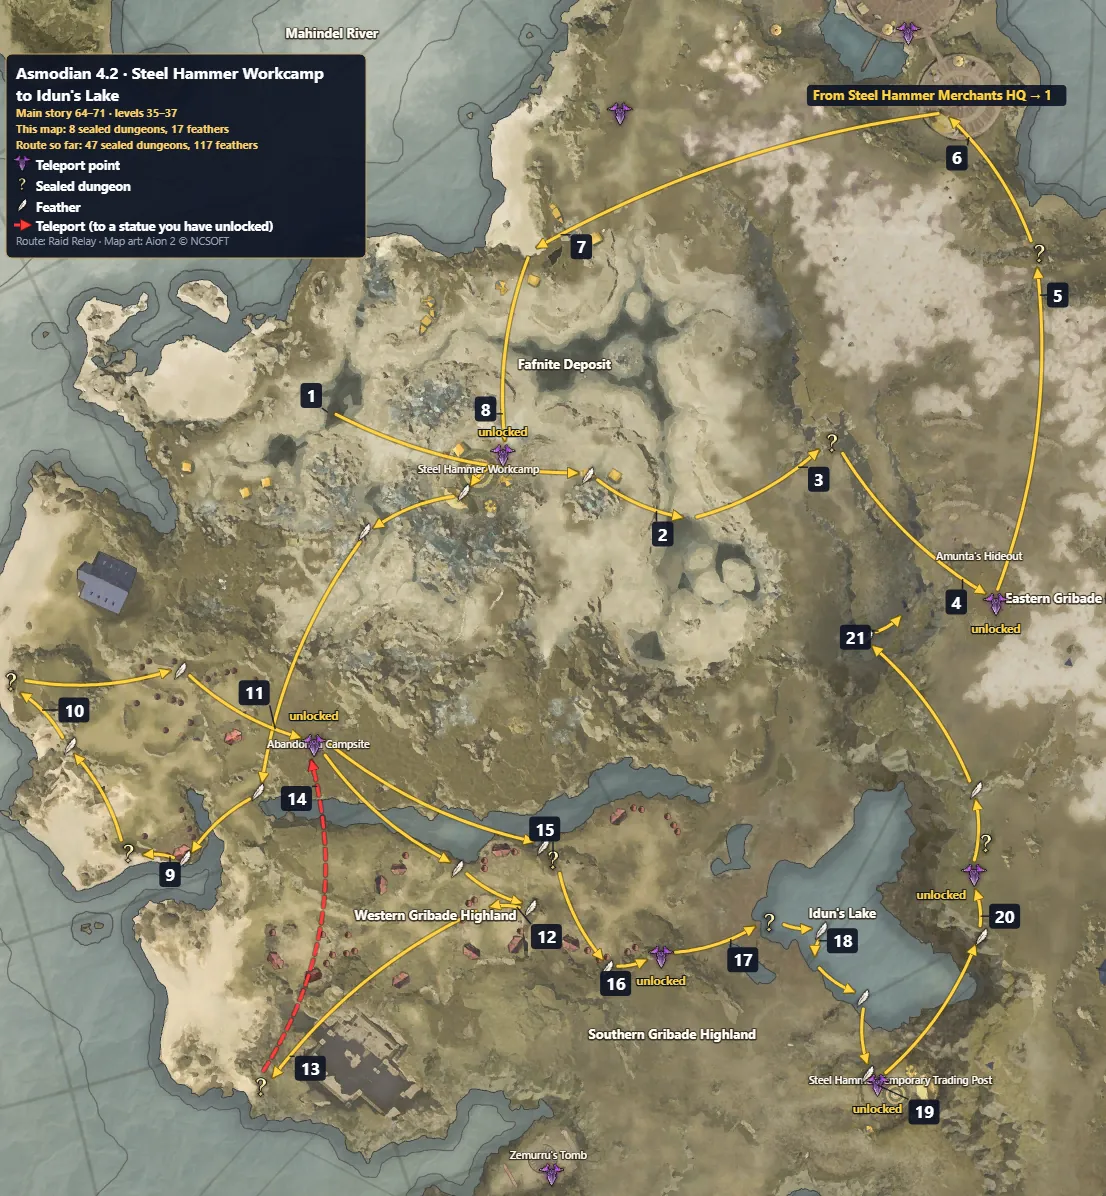
- Feather cluster: take every magenta feather in the ring
- Sealed dungeon: 2 Daevanion and 2 skill points each
- Feather
- Walk
- Teleport
Map 4.2's 21 steps as text
- Fafnite Deposit — Powder of Death: defeat Contaminated Shulak Miner, talk to Mannikiki — Steel Hammer Workcamp.
- Fafnite Deposit — Powder of Death: search for survivors around quarry entrance, search for survivors around quarry wall, search for survivors inside central quarry, find the worker's lost bag, defeat the dangerous Luminous Cadaver Insectoid.
- Spider Cave (sealed dungeon) — Unlocks the Amunta's Hideout teleport.
- Amunta's Hideout (teleport here)
- Fungie Habitat (sealed dungeon) — Powder of Death: hand in to Nemon — Steel Hammer Workcamp. Creion of Gribade: pick up from Nemon — Steel Hammer Workcamp.
- Steel Hammer Merchants HQ — Creion of Gribade: ask around about the Creions.
- Fafnite Deposit — Creion of Gribade: talk to Nemon, hand in to Mannikiki — Steel Hammer Workcamp. Frozen Fafnite: pick up from Mannikiki — Steel Hammer Workcamp. Unlocks the Steel Hammer Workcamp teleport.
- Fafnite Deposit — Frozen Fafnite: collect supplies from the Fafnite cart, defeat the quest target around the supplies, talk to Mannikiki — Steel Hammer Workcamp, talk to Snotra — Steel Hammer Workcamp, talk to Snotra, defeat the Faded Predator and Floater that disrupt the recovery, recover the Miner's belongings, recover the Cart Worker's belongings, recover the Sentinel's belongings, hand in to Nemon — Steel Hammer Workcamp. Inevitable Encounter: pick up from Nemon — Steel Hammer Workcamp, talk to Nemon, talk to Nemon at the Abandoned Campsite entrance.
- Scale Altar (sealed dungeon)
- Shulak Cave (sealed dungeon) — Inevitable Encounter: hand in to Pordhet — Abandoned Campsite. Unveiling the Truth: pick up from Pordhet — Abandoned Campsite.
- Western Gribade Highland — Unveiling the Truth: check the Reconnaissance Report, defeat the Blades Scout near the campsite, defeat the Blades Sentry near the campsite. Unlocks the Abandoned Campsite teleport. Unveiling the Truth: talk to Nemon — Abandoned Campsite.
- Western Gribade Highland — Unveiling the Truth: defeat the Blades, search the Document Box, examine the Stacked Documents, steal the key from Blades Elite Sentinel, hand in to Nemon. Lake of Confrontation: pick up from Nemon, enter the Blades Supply Storage.
- Empty Cave (sealed dungeon) — Teleport to Abandoned Campsite.
- Abandoned Campsite — Lake of Confrontation: talk to Pordhet.
- Lonely Rock Chasm (sealed dungeon) — Unlocks the Idun's Lake teleport.
- Idun's Lake (teleport here)
- Pirate's Treasure Storage (sealed dungeon) — Lake of Confrontation: hand in to Nemon — Southern Gribade Highland. An Ill Fate's Resolution: pick up from Nemon — Southern Gribade Highland.
- Idun's Lake — An Ill Fate's Resolution: approach Idun's Lake. Unlocks the Steel Hammer Temporary Trading Post teleport.
- Steel Hammer Temporary Trading Post (teleport here) — An Ill Fate's Resolution: search the hideout entrance beneath the lake — Idun's Lake (back at step 18). Unlocks the Eastern Gribade Highland Cliff teleport.
- Odylium Marauders' Den (sealed dungeon) — An Ill Fate's Resolution: hand in to Nemon — Southern Gribade Highland. Mirror of Greed: pick up from Nemon — Southern Gribade Highland.
- Eastern Gribade Highland — Mirror of Greed: talk to Trekhi, hand in to Crobakhi — Steel Hammer Merchants HQ.
| Gives | Side quest | Level |
|---|---|---|
 Avenger Necklace (Epic) | Bloodstained Rose | 37 |
All mapsSee it on the interactive mapNext: 4.3 · Steel Hammer Merchants HQ to Steel Hammer Temporary Trading Post →
4.3 Steel Hammer Merchants HQ to Steel Hammer Temporary Trading Post
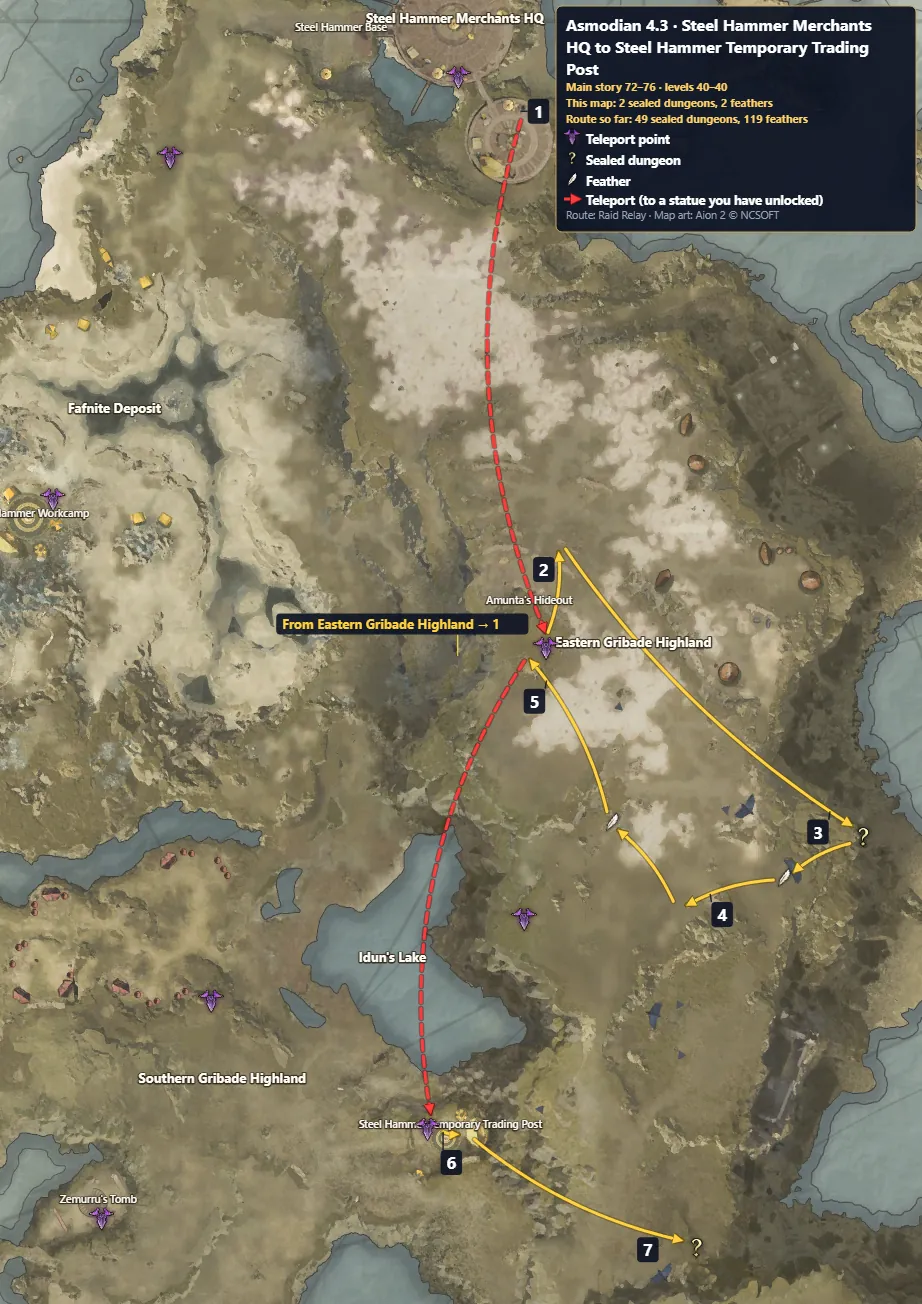
- Sealed dungeon: 2 Daevanion and 2 skill points each
- Feather
- Walk
- Teleport
Map 4.3's 7 steps as text
- Steel Hammer Merchants HQ — Fafnite's Whereabouts: talk to Popokiki. Teleport to Amunta's Hideout.
- Eastern Gribade Highland — Fafnite's Whereabouts: search the Damaged Wagon Wheel, search the Blood-Stained Rock, defeat the Search Party Sentry and Tayga, talk to the escaped Mau, find and talk to Traska, find and talk to Arita, hand in to Umbaba — Amunta's Hideout. Exiled Ritualist: pick up from Umbaba — Amunta's Hideout, remove Black Claw Guard Troopers Totem, defeat the quest target, enter the Prisoners Grotto, hand in to Amunta — Amunta's Hideout. Healing Herbs: pick up from Amunta — Amunta's Hideout, defeat Drakan Patrol Supporter, collect herbs from the supplies.
- Rock Cave (sealed dungeon)
- Eastern Gribade Highland — Healing Herbs: defeat Drakan Patrol Scout, hand in to Lakiba — Amunta's Hideout.
- Amunta's Hideout — Treatment: pick up from Lakiba, hand in to Amunta. Symbol of Liberation: pick up from Amunta, collect materials from Drakan Patrol Totem — Eastern Gribade Highland (back at step 4), retrieve the Drakan Patrol Sorcery Talisman — Eastern Gribade Highland, search the Pile of Broken Totems — Eastern Gribade Highland. Teleport to Amunta's Hideout. Symbol of Liberation: talk to Amunta. Teleport to Steel Hammer Temporary Trading Post.
- Steel Hammer Temporary Trading Post — Symbol of Liberation: meet with Amunta, gather materials from the Shulak Cart.
- Destruction Archons Armory (sealed dungeon) — Symbol of Liberation: hand in to Amunta — Zemurru's Tomb.
All mapsSee it on the interactive mapNext: 4.4 · Zemurru's Tomb to Impetusium Square →
4.4 Zemurru's Tomb to Impetusium Square
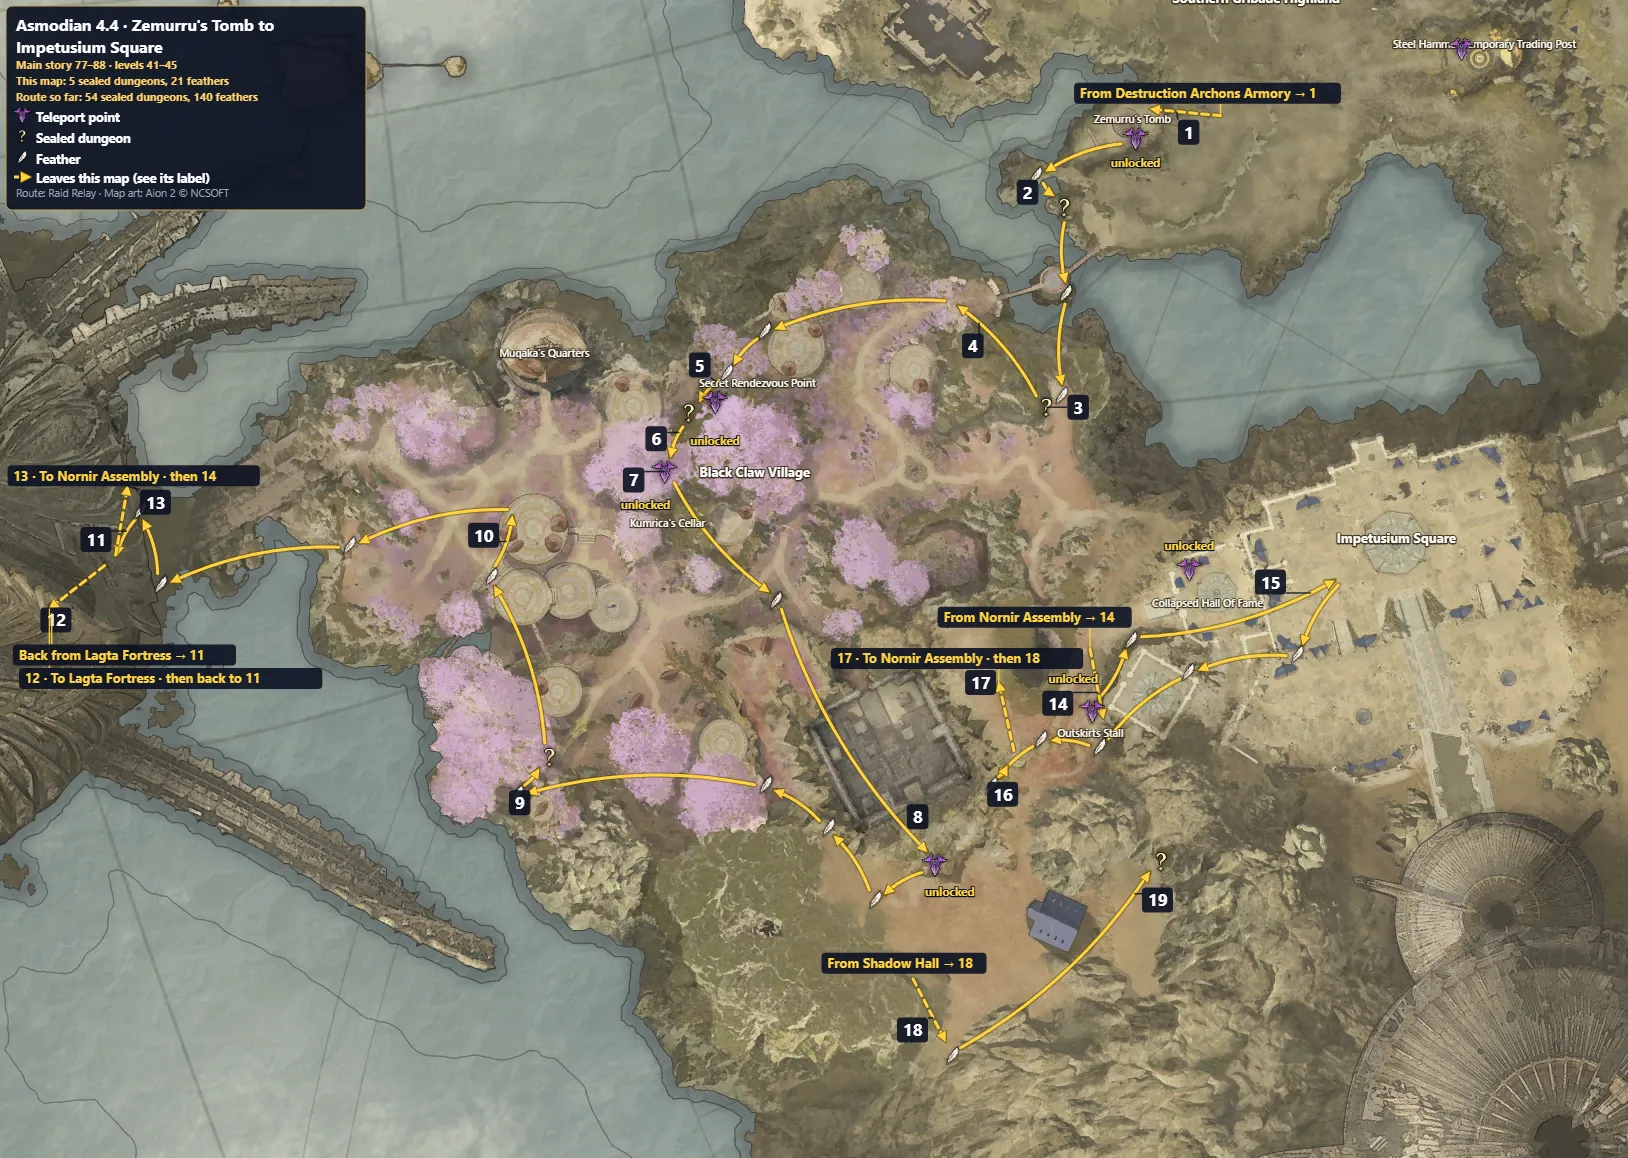
- Feather cluster: take every magenta feather in the ring
- Sealed dungeon: 2 Daevanion and 2 skill points each
- Feather
- Walk
Monolith level 30: you pass 560 points (187 pickups) on this map. Its title, Saint of Altgard, gives Defense 300, Damage Tolerance 3% and Block 100 equipped.
Ascension gate after Forgotten Commander: when your Ascension Gauge is full, the Ascension quest The One Who Witnesses the Nightmare opens; take it from the Journal's Ascension tab and complete it to go on with Daeva Trapped in a Nightmare. Until the gauge is full, do nearby green side quests and sealed dungeons.
Map 4.4's 19 steps as text
- Zemurru's Tomb — Daybreak Society: talk to Karumba.
- Place of Rest (sealed dungeon)
- Den of Exiles (sealed dungeon)
- Black Claw Village — Daybreak Society: talk to the quest target, check the quest target. Unlocks the Secret Rendezvous Point teleport. Daybreak Society: go to the Secret Rendezvous Point — Secret Rendezvous Point.
- Tayga Breeding Ground (sealed dungeon) — Daybreak Society: hand in to Nemon — Secret Rendezvous Point. Daybreak Society Rescue Operation: pick up from Nemon — Secret Rendezvous Point. Unlocks the Kumrica's Cellar teleport.
- Black Claw Village — Daybreak Society Rescue Operation: destroy the Balaur Sacred Totem, defeat Mumu Watcher.
- Kumrica's Cellar (teleport here) — Daybreak Society Rescue Operation: follow the tracks of the Society Member — Black Claw Village (back at step 6). Unlocks the Impetusium Lower Path teleport.
- Impetusium Lower Path (teleport here)
- Kumbahum's Cave (sealed dungeon) — Daybreak Society Rescue Operation: hand in to Kumrica — Kumrica's Cellar. The Breaking of the Day: pick up from Kumrica — Kumrica's Cellar.
- Black Claw Village — The Breaking of the Day: collect an entry permit from the supply chest, obtain Chief's Bodyguard's vambraces, obtain Chief's Sentinel's weapon, hand in to Kumrica — Kumrica's Cellar. Chief of the Black Claw: pick up from Kumrica — Kumrica's Cellar, go to Muqaka's Quarters — Muqaka's Quarters, hand in to Kumrica — Kumrica's Cellar. High Priest's Fafnite: pick up from Kumrica — Kumrica's Cellar, talk to Kunpata — Kumrica's Cellar.
- Lagta Fortress — High Priest's Fafnite: talk to the Lagta Brigade Sentinel.
- Lagta Fortress — High Priest's Fafnite: go to the Fafnite Storage, talk to Nemon in front of the fortress, hand in to Nemon — Zemurru's Tomb. The High Priest Awakens: pick up from Nemon — Zemurru's Tomb.
- Nornir Assembly — The High Priest Awakens: talk to Urd. Unlocks the Nornir Assembly teleport. The High Priest Awakens: talk to Nornir Oldan, talk to Nornir Sandre, hand in to Nemon. Lingering Apparitions: pick up from Nemon. Unlocks the Outskirts Stall teleport.
- Outskirts Stall — Lingering Apparitions: join Nemon at the Outskirts Stall. Unlocks the Collapsed Hall of Fame teleport. Lingering Apparitions: operate the Impetusium Guardstone — Collapsed Hall Of Fame, talk to Wiste's Apparition — Collapsed Hall Of Fame, talk to Haz's Apparition — Collapsed Hall Of Fame, talk to Hort's Apparition — Collapsed Hall Of Fame, talk to Nemon — Collapsed Hall Of Fame.
- Impetusium Square — Lingering Apparitions: defeat Balaur Dispatch Combatant, recover the remains of the Destruction Archon, defeat Balaur Dispatch Sentinel, hand in to Nemon — Collapsed Hall Of Fame. Blood Barrier: pick up from Nemon — Collapsed Hall Of Fame, talk to Wiste's Apparition — Collapsed Hall Of Fame, talk to Hort's Apparition — Collapsed Hall Of Fame, talk to Nemon — Collapsed Hall Of Fame, destroy the Incomplete Subspace Rift, defeat the Balaur Dispatch, defeat Remnant of Subspace, hand in to Nemon — Collapsed Hall Of Fame. Zikel's Core: pick up from Nemon — Collapsed Hall Of Fame, talk to Hort's Apparition — Collapsed Hall Of Fame.
- Black Claw Village — Zikel's Core: go to the outskirts of the Impetusium, hand in to Nemon. Farewells: pick up from Nemon.
- Nornir Assembly — Farewells: go to Nornir Assembly, deliver the news to Urd, talk to Nemon, talk to Hallina, talk to Crobakhi — Steel Hammer Merchants HQ (off this map), talk to Baba — Quai Campsite (off this map), talk to Hadala — Shadow Hall (off this map), hand in to Menrik — Fang Hideout. Forgotten Commander: pick up from Menrik — Fang Hideout.
- Black Claw Village — Forgotten Commander: talk to Kiara, investigate Draupnir, talk to Ivar. Daeva Trapped in a Nightmare: hand in to Nemon — Outskirts Stall (back at step 14).
- Ascetic's Cave (sealed dungeon)
| Gives | Side quest | Level |
|---|---|---|
 Liberator Earrings (Epic) | Herb Pouch Heist | 44 |
 Liberator Bracelet (Epic) | Lest We Forget | 45 |
Reached level 45? Gear score is next: the gear score guide takes both factions from 700 to 3,000.
Alt leveling route: Asmodian, no feathers
For a second character on your main’s server: the same maps, story, sealed dungeons and side quests as the route above, without the feathers. Your server’s feathers are synced at the Monolith, so go straight from one numbered stop to the next and pass the feathers, the magenta rings and the arrows’ detours to them. What the alt earns at levels 10 and 16, and what to claim before you delete it: the alt rewards guide.
- Levels 1–10: the Ishalgen tutorial, as for a main.
- Maps 1.1–1.2, levels 10–16: follow the numbers and skip 48 feathers. Map 1.2, step 10 (Altgard Monolith): at the Monolith, Sync Empyrean Traces first. The button, at the bottom left of the Monolith window, brings over every feather your server has collected. Where a map’s note mentions feathers (the start of map 1.1, map 1.2 step 11, the start of map 2.3), skip that part.
- Maps 2.1–3.1, levels 18–22: follow the numbers and skip 31 feathers. Map 3.1, after the Ascension gate (Verdant Melody): Daeva in a Dream, level 22. This quest opens Expeditions and your alt’s Odyle; the level alone does not. From then its Odyle fills while you play your main: 15 every 3 hours, up to 560, or 840 with membership.
- Maps 3.2–4.4, levels 24–45: follow the numbers and skip 108 feathers.
- Level 45: ready to farm. At 700 gear score your alt can claim Conquest 1★, at 1,400 Conquest 2★: see the alts guide’s level 45 steps, and the gear score guide for the climb.
Leave the grind to us.
Our pilots take your character through the whole story, every feather included.
The route on every map, its sealed dungeons and the 187 feather pickups are ours, from the game’s client data. Map art, icons and quest data from Aion 2, © NCSOFT Corporation. Raid Relay is a fan project, not affiliated with or endorsed by NCSOFT. Guide text and analysis © 2026 Raid Relay. Please link to this page rather than copy it.
The main-story order on maps 1.1–3.3 is based on Krix’s Asmodian speedrun guide. The sealed-dungeon and feather routing (the 187 feather pickups) and maps 3.4–4.4 are ours. Map art, icons and quest data from Aion 2, © NCSOFT Corporation. Raid Relay is a fan project, not affiliated with or endorsed by NCSOFT. Guide text and analysis © 2026 Raid Relay. Please link to this page rather than copy it.